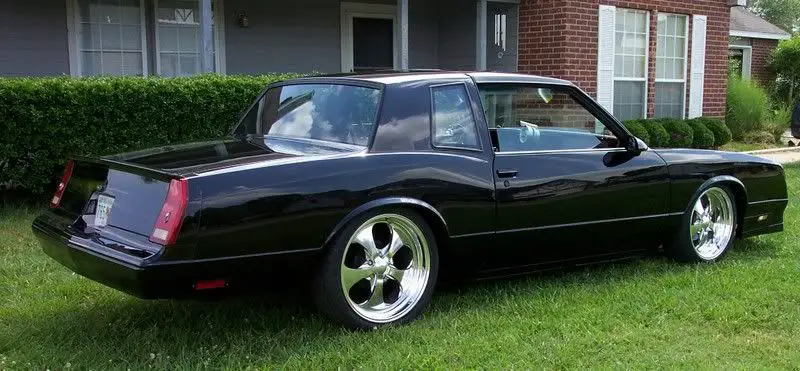
HAFRODs 78 Aeroback Salon build

Status
Not open for further replies.
You should have the vinyl guys make your air cleaner decal a on the 442 be an outline like the door decals. I like the idea of the Olds not being in all caps too.

Looks great.

Where are you located, I am in Tulsa, always looking for good G-body parts stashes if you don't mind sharing.
 
I know you don't dig spray paint.
 
Last edited:
I drug out my original destroyed dash from my shed. I removed all the harness and duct work from it. I then got out my mid 80s 4 door Cutlass dash just to mock up the 78 harness to it. Noticed the right side of the new dash has no square holes for the coutesy floor light. Going to drill two big holes and two smaller mounting holes in the new dash bottom, cut off the small area with the squares from my original dash and bolt it on the new dash. I'll use some 10/24 button head allens so they don't protrude. The other issue I found was when I went to rearrange the terminals on the #2 main cluster connector to swap in a ralley gauge set. This diagram shows a connector #1 and a #2 but my 78 harness does not have a #1. http://tech.oldsgmail.com/eint_rallye_swap.php I'm stuck here unless someone knows what I need to do. I may post this in the electrical section. I do have the mid 80s Cutlass dash harness that has connector #1 on it. Do I need to wire the connector from it to my harness?
 
Was hoping to make some killer progress but nope. I got the firewall re shot. Had my redone engine wire harness mostly finished till I remembered the tach wire for the ralley cluster. I'm going to use a spare wire harness and remove a male and female spade. I'll install them in an empty slot in mine. This way there's no extra hole in the firewall. I got my new dash modified for the RH under dash light. I also got it scotchbrighted and cleaned. Probably spray it and the A pillar pieces tomorrow. I'm hoping to start it this weekend. I have to finish my steering column before painting it. I have it apart changing the key tumbler, dimmer switch, and ignition switch. It is a tilt from an automatic floor shift car. There is a couple differences from a manual floor one. This car did not have tilt.
 
  • Like
Reactions: Rktpwrd
I'm hiding/rerouting wiring in the engine bay. The temp sender wire was modified with stuff here and I love the way it came out. I have a weatherpack single connector coming from ebay so it can be unplugged behind the head if engine needs removed. I used a piece of 5/16 trans line and bent it with my benders. I flared the ends so the wire would not get chaffed. I put on some new style woven wrap and put heat shrink on the ends to lock the woven sleeve down. I used some stainless clamps and ARP short bolts. I welded a small L bracket to the motor mount. I also welded a square nut on the back of the L bracket. It safely routes the wire away from exhaust and hides it.

 
  • Useful
  • Like
Reactions: Andebe and liquidh8
Most of you guys know that most motor oils do not have zinc in them anymore. This is the biggest additive needed for flat tappet cams in our G's. I used Rotella for the last few years but they removed most of the zinc recently. I got Comp Cams oil and additive. Its expensive but cheaper than replacing a cam. I always prime my engines with my homemade tool. I cut up an old CC HEI and chuck it in my drill. I can get 60 lbs this way. Now, if you've never primed an engine, you'd be shocked at how long it takes a new engine to start oiling at the rockers. It takes about 2-5 minutes depending on your oil weight and how cold it is. I had primed this motor when I built it but its been sitting. I also only had Rotella in it.

 
I'm hiding/rerouting wiring in the engine bay. The temp sender wire was modified with stuff here and I love the way it came out. I have a weatherpack single connector coming from ebay so it can be unplugged behind the head if engine needs removed. I used a piece of 5/16 trans line and bent it with my benders. I flared the ends so the wire would not get chaffed. I put on some new style woven wrap and put heat shrink on the ends to lock the woven sleeve down. I used some stainless clamps and ARP short bolts. I welded a small L bracket to the motor mount. I also welded a square nut on the back of the L bracket. It safely routes the wire away from exhaust and hides it.

The work you did with hiding the wiring inside tubing looks suspiciously familiar...😉
That's exactly what I did for the temp sending wires etc on mine, right down to flaring the end...
If post a pic of it, but I know how you feel about that!
Either way, nice job, looks good.
 
Status
Not open for further replies.

GBodyForum is a participant in the Amazon Services LLC Associates Program, an affiliate advertising program designed to provide a means for sites to earn advertising fees by advertising and linking to amazon.com. Amazon, the Amazon logo, AmazonSupply, and the AmazonSupply logo are trademarks of Amazon.com, Inc. or its affiliates.

Please support GBodyForum Sponsors

Classic Truck Consoles Dixie Restoration Depot UMI Performance

Contact [email protected] for info on becoming a sponsor