roof rot malibu

Status
Not open for further replies.
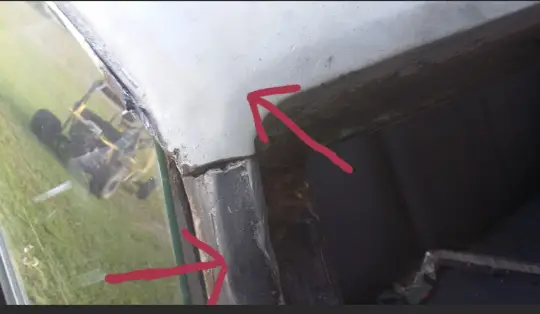
I may not understand since I'm not there looking at it. Initially on dad's car, I wanted to flange the car and then lay the patch on top. That wasn't possible since we couldn't get the flanging tool in near the edges at the wheelhouse or doorjamb. With our patches, where we have a tab, the patch is 5/8" bigger than the opening on the car. This extra 5/8" is for the flange. At the edges, the patch was trimmed to butt weld as there was no room there for the flange. The purpose of the flange is to provide strength/support for the welding to limit warpage. It is helpful along the long flat expanses of sheet metal that are the most prone to warpage.

With your roof, you need it to butt on both sides. Then you need it 5/8" longer than it needs to be across the top. You would flange that extra 5/8" so it would slip under the remaining portion of the existing roof. You would be fine plug welding that seam but I think I would use the adhesive. On the sides, you could weld them together with a series of tacks. That area is strong because of all of the shape. I hope this makes sense.
I am going to use panel adhesive all the way around. Was going to flange existing roof to lay replacement skin into and put my adhesive there and along drip rail and across windshield flange. Where the back edge of new skin meets the drip rail I am not going to be able to flange because of curve in roof skin. I think I will have to cut a notch on new skin back toward windshield direction so when I lay skin in flange, it will line up with roof rail. Then weld that particular area.
 
  • Like
Reactions: Texas82GP
It doesn't look bad. Not worried about the gap as pop will fill that with silver and I will grind smooth. I am more concerned with the body line that runs up the a pillar and the curve body line that goes around windshield. The a pillar body line just ends on top of a pillar. No continuation onto replacement skin. And the curved body line on replacement skin at windshield, there is no body line on a pillar that seems to match that one. Or is it just me??
Yeah I see that now. It would be nice to see a close up of that area on another Malibu and on an El Camino.
 
  • Like
Reactions: malibujustin
Yeah I see that now. It would be nice to see a close up of that area on another Malibu and on an El Camino.
Yes I would like to see a close up pic of that area on another malibu 78-81. My old roof was to far gone and filled with foam and bondo to take a good pic. Just doesn't look right to me. Like it is from different g body car. The skin Was only $20 though.
 
  • Like
Reactions: Texas82GP
David,
I believe that bodyline ends right there. I'll take a look at mine and report back. So far I don't think it looks bad. Also the drip rail ends a bit short, but that's how these cars are made....the piece of A-pillar moulding compensates for that.
 
David,
I believe that bodyline ends right there. I'll take a look at mine and report back. So far I don't think it looks bad. Also the drip rail ends a bit short, but that's how these cars are made....the piece of A-pillar moulding compensates for that.
Thanks mr Jack. Yea the drip rail kinda trails off. How bout the curve around the windshield area body line if the a pillar line ends there? Thanks
 
Dave,
Here's a pic that I took a little while ago. As you see, that sculpted bodyline does continue from the roof to the A-pillar. I hope this helps somewhat.
Don't forget, the wagon, or 4-dr windshield pillar is not swept back like a 2-dr vehicle. They're similar, but the 4-dr is a little more upright.
MVC-908S.JPG
 
Last edited:
Dave,
Here's a pic that I took a little while ago. As you see, that sculpted bodyline does continue from the roof to the A-pillar. I hope this helps somewhat.
View attachment 65737
Thanks. It helps. Looks like the replacement is not quite right. The arrows on the attached pics show my concerns. And that body line on the A pillar does keep going on yours mr Jack. Yours doesn't have the curve body line near windshield either. Don't think what was left of mine did. Ughhh.
 

Attachments

  • Screenshot_2017-05-08-11-46-12-1.png
    Screenshot_2017-05-08-11-46-12-1.png
    226.5 KB · Views: 172
  • Screenshot_2017-05-08-11-47-59-1.png
    Screenshot_2017-05-08-11-47-59-1.png
    219.5 KB · Views: 162
Dave,
I do have the same curved line on top. It just doesn't look as sharp, or pronounced as yours due to to a buildup of body filler and layers of paint and primer. If I recall, I also had to weld in a small patch in that area.
I could see that the roofline doesn't quite match the A-pillar line. I think you'll be able to improvise a new line. Perhaps with a bead of weld and some All Metal. I'll bet the All Metal would help sculpt a nice continued line. ..or if you know anyone that's good with lead work.
Did he say what kind of car it was off of?
What do you think, Jared?
 
Last edited:
  • Like
Reactions: malibujustin
Dave,
I do have the same curved line on top. It just doesn't look as sharp, or pronounced as yours due to to a buildup of body filler and layers of paint and primer. If I recall, I also had to weld in a small patch in that area.
I could see that the roofline doesn't quite match the A-pillar line. I think you'll be able to improvise a new line. Perhaps with a bead of weld and some All Metal. I'll bet the All Metal would help sculpt a nice continued line. ..or if you know anyone that's good with lead work.
Did he say what kind of car it was off of?
What do you think, Jared?
Hmmm...so how would I get the curved line to flow into the a pillar? Remove all paint and use filler to feather it down onto a pillar? And maybe the same thing up the a pillar onto the roof ? I believe he said 79 or 80 malibu. He sent a pic of car he took it off of. The one that's got me perplexed is the curve around the windshield part.
 
Dave,
I do have the same curved line on top. It just doesn't look as sharp, or pronounced as yours due to to a buildup of body filler and layers of paint and primer. If I recall, I also had to weld in a small patch in that area.
I could see that the roofline doesn't quite match the A-pillar line. I think you'll be able to improvise a new line. Perhaps with a bead of weld and some All Metal. I'll bet the All Metal would help sculpt a nice continued line. ..or if you know anyone that's good with lead work.
Did he say what kind of car it was off of?
What do you think, Jared?
I think that issue can be overcome with body work. I'm not right there looking at it and might change my mind if I was, but I think I would start with puting a tack weld at the inside corner where the front of the A pillar turns inward for the windshield opening and then hammer and tack weld to get it in alignment. Then I would body work it with metal to metal and then finish with Rage Extreme.
 
Status
Not open for further replies.

GBodyForum is a participant in the Amazon Services LLC Associates Program, an affiliate advertising program designed to provide a means for sites to earn advertising fees by advertising and linking to amazon.com. Amazon, the Amazon logo, AmazonSupply, and the AmazonSupply logo are trademarks of Amazon.com, Inc. or its affiliates.

Please support GBodyForum Sponsors

Classic Truck Consoles Dixie Restoration Depot UMI Performance

Contact [email protected] for info on becoming a sponsor