What Did You Do To Your G-Body Today? [2021]

Status
Not open for further replies.
DSCN2981.JPG


DSCN2982.JPG


Just a quick peek in the box that holds my brand spanking new Monte Carlo driver's door skin. These panels just by themselves are almost every bit of 6 feet long.

Tried for a detail shot here with mixed results but the intent was to show that the perimeter flanging for both sides and the bottom edge has already been measured and initially creased. No guess work as to how to locate the skin against the inner frame/skin/shell/aka ??. Apparently the secret here is to use a leather faced or dead blow hammer so as to not mar or dent the skin as the edge is being hammered over.


DSCN2986.JPG


The carton says it all. A genuine Goodmark product, which was what I had hoped to get,

DSCN2987.JPG


This is a shot of the packing details. Things like the net and gross weight of the box are bits of information that the couriers need but the big ticket item is the location of production.

"Made in Taiwan, REPUBLIC of CHINA". Not across the Formosa Strait in Pee-Roc land, but from a nation that the UN disowned over 50 years ago, and which is now one of the leading producers and manufacturers of VHT (very high tech) components found in service all over the world. This is by no means a plug but if I can't get a product made in Canada, or the USA, having it come from Taiwan disturbs me not in the least.

Actually the source kind of explains why the prolonged lead time to delivery, not that the pandemic helped any.

(Side Bar Here; Taiwan, currently, is suffering from a prolonged drought. Nothing new in many places but they are also the leading manufacturer of the chips that go into the present generation ECU's found in a substantial number of vehicles all over the world. For the chip making process, a large steady supply of clean water is needed; part of the various stages of manufacture to keep the product clean and sterile. No recycled water allowed.)

So, for this panel to get to me, it had to be made, packaged, loaded into a container, the container put on a ship, the ship had to avoid the "mainland pirates" and successfully reach the Port of Vancouver, where the container would have been offloaded, sent through customs, the contents sorted at the receiving terminal and rerouted to wherever in the country. BUT TWO YEARS?!?!

So for anyone out there waiting on a large ticket item, (like a door skin?) do be prepared for the long wait. There actually was a news item aired today about the ports at Long Beach and Los Angeles and the problems they are having with their receiving schedules. The port press rep commented that they had something like between 100-160 container ships waiting out in the approach for permission to enter the ports for unloading. About a week delay or more. The problem? No truck drivers to move the short haul donkeys that receive the containers being offloaded from the holds by the cranes. The scheduled turn around for a container ship from full to empty and back again is about a day or less. Right now, just for the unloading, it is days, plural.

All of which means that if you want a christmas tree and things to put under it you had better order yesterday because finding stock on the shelves for your christmas shopping is anything but guaranteed this year.

Me, I think I just got my Christmas present a little early this year; so I put it back in its box and taped it closed. I can wait, and it is the perfect excuse to take my shop tree out of its carton and put it up this year. (Didn't happen last year.)

Doesn't stop me from skinning out the old door and making any repairs to the inner skin that have to occur.


Nick
 
Beautiful Saturday, drove it to work. Little G body show in the parking lot lol. Crazy how much lower Cory's Monte sits, and mine is lowered an inch already! Might make a serious altitude adjustment over the winter.
Resized_20211009_125346.jpeg


In other news, leaving work and a mid 90's Cobra bit off more than he could chew. I smoked his azz, then he pulled up with an excuse how he was in the wrong gear. I laughed and told him that sounded like something a Mustang guy would say after losing haha!
 
Injected Cutty, Shame on You! LOL Luring that innocent helpless lamb in his Cobra into thinking he had it made in the shade going against some dude in a grand-dad-mobile and then royally smoking his *ss!! LMAO. I'll bet the smile on your face would have needed a dentist to get rid of it. Shouldn't tease the innocents; they tend to bite when they get all frustrated and confused as to what just happened.


Nick
Funny thing is he provoked it. I was in a median and had to wait for him to pass so I could merge. I revved as he went by so I quickly caught up. No joke, I giggled about it for a solid 15 minutes because the look of butthurt on his face. Even worse, pretty sure it was his teenage son in the passenger seat that watched his old man get beat up on 😂😂.

Scott
 
Beautiful Saturday, drove it to work. Little G body show in the parking lot lol. Crazy how much lower Cory's Monte sits, and mine is lowered an inch already! Might make a serious altitude adjustment over the winter.View attachment 185133


In other news, leaving work and a mid 90's Cobra bit off more than he could chew. I smoked his azz, then he pulled up with an excuse how he was in the wrong gear. I laughed and told him that sounded like something a Mustang guy would say after losing haha!
You can go plenty lower. Lol. I will measure my height sometime and relay it over. I know that I can barely fit a 2x4" on its side under my cross member. Lol. Some days it's too low, but not often.
 
Beautiful Saturday, drove it to work. Little G body show in the parking lot lol. Crazy how much lower Cory's Monte sits, and mine is lowered an inch already! Might make a serious altitude adjustment over the winter.View attachment 185133


In other news, leaving work and a mid 90's Cobra bit off more than he could chew. I smoked his azz, then he pulled up with an excuse how he was in the wrong gear. I laughed and told him that sounded like something a Mustang guy would say after losing haha!
23.5" to the middle of the front fender wheel opening, 25.5" to the middle of the rear fender wheel opening. Is what I'm sitting at right now.
 
Tried for a detail shot here with mixed results but the intent was to show that the perimeter flanging for both sides and the bottom edge has already been measured and initially creased. No guess work as to how to locate the skin against the inner frame/skin/shell/aka ??. Apparently the secret here is to use a leather faced or dead blow hammer so as to not mar or dent the skin as the edge is being hammered over.
There are probably a couple dozen ways to skin a door, and just as many tools declared to be "the answer".

How I do it:

Verify that the skin is undamaged and lays correctly on the shell.

Grind the hem flange on the inner shell, and a strip about 1/2" wide on the inside of the 3 sides that will be hemmed over

Apply panel bonding agent of your choice. "Wet out" the exposed bare steel (acid brushes or a bondo spreader work for this). Apply a bead of adhesive to one side of the mating surfaces

Install panel to shell

Take a grinder with 80 grit and LIGHTLY make a quick pass over the panel where the hem has been pre-bent. Make just 1 pass, and USE LIGHT FORCE. Too many passes or too heavy and you'll wind up either grinding through, or the panel will split when hemmed. Doesn't seem like much, but does make it easier to fold. Again, tread lightly here.

Using a dolly on the outer surface, begin hammering the hem over. I prefer to bend it in 3 stages, using light/medium hammer blows, and keep moving. Trying to bend it all the way over in one go or not moving along will end in disaster, and a lot of additional work. Hold the dolly flat against the panel, and only have a little more dolly on the panel than the hem area is wide

There will be adhesive squeeze-out, that's OK, it actually helps seal the hem to prevent corrosion/swelling in the future. Clean the squeeze-out with a solvent before it sets.

Re hang the door assembly to verify the shape/contour/fitment is correct, and adjust as required. I always leave the door hung overnight to allow time for the adhesive to cure enough to be handled without worrying about twisting.

If it's your first rodeo, expect that there will be some bodywork required, even experienced veterans deal with it from time to time.

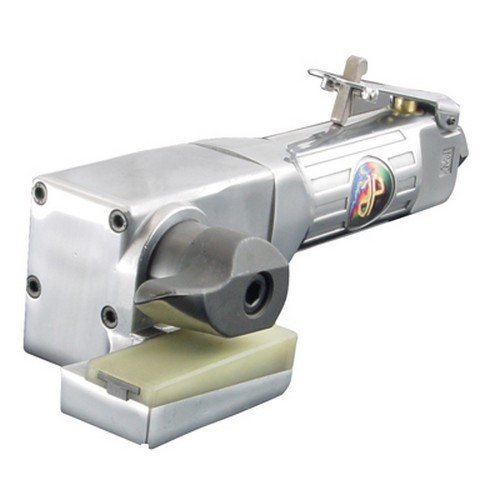
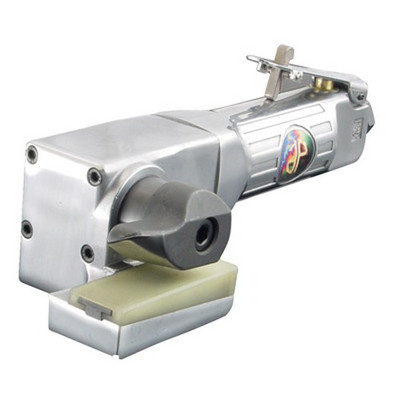
As for tools, You could use gaff tape or duct tape on the dolly if you're worried about the hardness, but you really want to have a hard surface to fully fold over the hem. There is one doorskin tool that I use from time to time, especially if the edges are pretty smooth without a lot of contours/style lines. I have a link and pic below. It works very well with a little practice.

Image8151__46565.1367695643.jpg


I might suggest making a few practice panels to get a feel for the procedure. they would be pretty simple to make with a small sheetmetal brake to fold the hem on the edges to get started. You could probably get a damaged hood from any body shop for the sheetmetal to make practice panels out of for nothing
 
Finally broke down and installed a new starter. The S-10 starter got me by for quite a while, but was starting to get weak. Plug wires will come after some honey do shopping is done.

IMG_20211009_192011.jpg
 
Knew a body shop that was in business about 40 or so years ago. The body man had a wicked sense of humor and loved to repair cars that had had their body panels bonded on at the factory by removing the damaged or rusted out panel and spot or plug welding the new piece in place rather than employing adhesive. Dude figured that if the car lasted long enough to where it needed panel repairs again, the tech who got to do the work would go nuts trying to figure out how the seam had been made. Like i said, weird humor; must be a body-banger thing.

As for how it will all go together, at this point I still have to split the old skin off the inner shell and visit any of the thus revealed damage, such as the lower corners, and replace what is no longer there with fresh body metal. Once that happens, I will be turning my attention to marrying the two sections, inner and outer, together. I actually had not given much consideration to adhesive even though I had used it during one session of panel work on my S-10. If I did go glue, it would likely be more as a way to place and align the panel rather than full seam application. For my final seam work, it would probably be hammer and dolly to bring the flange all the way over and down into and then a series of either plug welds or tacks to hold it all together.

Adhesive is not a bad idea at all as it eliminates the potential for warp during the assembly from heat generated by the welder. Thing here is that I use gas MIG for my metal work and my Miller has a wide enough range that I can set it for very light metal and minimize the heat produced as much as possible.

In making this seam, what I am looking for is a way for any moisture that WILL appear at some point to find a way to exit the building. The adhesive would completely seal off the strip of contact between the two panels which is good and strong, thing here is that the system of vents and scuppers that GM employed as ways for any water that did find its way into the interior of the door to move on and out, were not all that effective and a full bead of adhesive would pretty much close them up when the panels got put together.

Pretty much any of the doors that I have ever located and inspected have had their lower seams totally rotted out to the point of gone, baby, gone. So, in my mind, there is this either/or argument; either being go for the totally sealed tight continuous seam down there, vs or, that being go with interrupted or periodic points of connection instead. To assist with drainage should i go with this option, the plan would be to drill small holes in the vee or apex of the flange bend that would allow moisture to pass as they would fall in open or unglued or welded points along the seam as a whole. Easier to show than explain; have seen it done in a factory format.

At this point in time this is all speculation on my part. Missing at this point is a budget to do all this, including the stand for supporting the door safely and securely. Eastwood has them for reasonable dollars, just a question of space. Plus winter is coming on and this year my garage is probably going become more of a cold weather storage unit rather than a warm active place to disconnect from reality for a while. Long story.


Nick
 
  • Like
Reactions: Longroof79
Status
Not open for further replies.

GBodyForum is a participant in the Amazon Services LLC Associates Program, an affiliate advertising program designed to provide a means for sites to earn advertising fees by advertising and linking to amazon.com. Amazon, the Amazon logo, AmazonSupply, and the AmazonSupply logo are trademarks of Amazon.com, Inc. or its affiliates.

Please support GBodyForum Sponsors

Classic Truck Consoles Dixie Restoration Depot UMI Performance

Contact [email protected] for info on becoming a sponsor