What did you do to your non-G body project today? [2021]

Status
Not open for further replies.
5SpdCab, Nice new engine stand!! Something to consider though, the mounting bolts for hanging that four armed mounting plate to the back of the block/ t-mission case flange need to be heavy grade, like grade eight or better. Also, score some heavy/thick flat washers. The tubes for the bolts are sometimes oversized to accept larger dia capscrews, at least they are on mine. I elected to prevent pull through by using the thick washers as a combination of end caps and spacers. You can get fender washers in various diameters and thicknesses and to get the right O.D. you just have to drill the I.D. to what size you need, 3/8ths or ? and run with that. I have nothing hanging off my stand so maybe I'll pop a couple of 'pegs tomorrow to illustrate what I am trying to describe here. The current bolt set is meant for transmissions so they are long enough to get through the mtg ears and have enough protruding thread that a heavy hex nut can thread on completely even with washers underneath it. Using the washers keeps the ears from being chewed up by the nuts.

On the rear end noise, the last time I went hunting for one of those noises, it turned out that one of the ring gear mounting bolts had backed out. Surprise, it was left hand thread!! Surprise, surprise, I ended up having to deal with the bolt that held the crosspin in place. Fortunately I got lucky and was able to fish out the stump of the pin. That was all done out on the back driveway; true shade tree operations, on my Ma's Cadillac. it still sits in my garage, under a cover; it's last task was to follow the hearse that took Mom to her final resting place. Not sure if it would even start after so long, Caddies have the oil pump at one end of the motor and the pickup at the other, like the 231 V-6 Buicks did; would have to pull the timer and seriously prime the motor before even reaching for the key. Hope your noise turns out to be something simple or easy or both.


Nick
 
  • Like
Reactions: 5spdCab
Tuned it a bit, got 19.5-20" of vacuum out of it at idle. also washed it and vacuumed out out the nuts and rat sh*t from the trunk. Took it to good guys. missed registration but hey theres always next year, if i still have it. hell it might even not be rusty anymore. fun fact: it gets like maybe 4mpg from the tiny one gallon jug i have shoved in the car. nicely cradled. you can barely see it under the hood. legal? no. safe? **** no. but my gas tank aint coming till october (thanks for the non existent backorder notice on the one thing you had on sale ecklers, you ****s) and car is too heavy to push.

i forgot to get a pic but there was a 79ish regal green on green with white top with 44k miles and a recently moist interior. lady wanted 9k for it. tried by best to not sound like an *ss when i said good luck. i think it had an iowa dealer badge. 231 car. only one hood shock which i found odd. cold ac apparently.

https://www.facebook.com/groups/613767412060248/user/1443984207/ <-- that is the car.

things that caught my eye: (yes i asked the guys if i could take a pic of the regal)
gg21_13.jpg
gg21_12.jpg
gg21_11.jpg
gg21_10.jpg
gg21_9.jpg
gg21_8.jpg
gg21_7.jpg
gg21_6.jpg
gg21_5.jpg
gg21_4.jpg
gg21_3.jpg
gg21_2.jpg
gg21_1.jpg
 
Last edited:
DSCN2829.JPG


Said if I had the time I would post pictures on the modifications I have made to my engine stand and transmission lift. Here is a detail shot of the heavy washers I suggested for use with the mounting bolts. These particular bolts were used to hang the transmission on the arms that attach to the back plate. They are about 3/16ths inch thick and are stamped with the "MCX" logo.

DSCN2831.JPG


Second detail shot of the MCX washers themselves. These are !/2 inch hole size. I get mine from a local industrial supply house; have to visit there tomorrow for some more of the 3/8ths as I am out again.


DSCN2833.JPG


DSCN2832.JPG


An overall shot of the engine stand and a detail shot of the conversion from a three wheeler to four. The square tube is 2" x either 3/16's or 1/4" wall, can't remember off hand. Most of what I used was recycled material except for the casters themselves. The plug welds still need to be dressed down; that may happen or it may not. Pretty in this instance was not a prerequisite for performance.

Thought I had a shot or two of the transmission jack in the can at this point but they may have failed because I was about all out of battery power.

DSCN2835.JPG


DSCN2836.JPG


Finally, a couple of progress shots for my Non-G body, G-10 body transmission swap. The tag barely visible near the front of the pan is a warning note that there is NO ATF in the pan!! Just a precaution on my part to avoid having to do yet another snatch and drop due to having a major brain fart and not filling the pan.
There are still a few items left to do on the list, like the drive shaft and the exhaust pipes. Both of these require decisions on using as is versus updating them. I would like to fit a new set of cross bearings to the yokes of the d-shaft but it may require some heat to encourage the old ones to leave the nest so to speak. They are not held in by that nylon retaining material that got used for a few years by GM, it is more a case of 40 plus years of just being there.
(Still wondering where the shots of the t-jack wandered off to..............)


It did get over a 100 degrees F. here yesterday and today looks to repeat that. Supposed to cool down and rain this evening but I may be feeling an ever so gentle pulling on my leg, the third one, c/w bells in this case, that leads me to believing in rain only if I see it coming down.

Now about those pics........................................


Nick
 
  • Like
Reactions: 5spdCab
Well, wherever the lift pictures went to, it was not to the memory card on my camera. So..........

DSCN2840.JPG
DSCN2841.JPG


DSCN2841.JPG


DSCN2842.JPG


DSCN2845.JPG


Shown here is a four shot summary of my version of a transmission jack. it is built on the chassis of a 2.25 ton floor jack, with the transmission adapter installed in place of the original pad. The adapter uses the same mounting hole as the pad.

The third shot in this sequence is a close up of how I chose to mount the replacement front axle assembly. i as noted elsewhere, the first thing i did was to decide to box the jack's side plates by welding a section of flat plate from one side to the other. To that I elected to add two small lengths of angle iron. These were first fitted to the axle by measuring and clamping them to the axle tube and then drilling the mounting holes in pairs as matched sets. The angles were then removed and the first the axle holes were tapped for threads and then the holes in the angles were overdrilled in the press. All this was so that bolts could be used to attach the axle to the angles, making it removable so that the jack could be returned to working the floor if ever needed. After that it was over to the welder and tack it all together to make sure it would work and then final burn in.

The pads for the outboard casters are just more of that angle iron. I may have to revisit my choice of casters because these seem to drag under load meaning their axles may have worn the holes in the wheels out. (Hey, they were free and used. ya get what ya scrounge for.)

The last shot is the max lift height. Without the 2 x 10's to pad the cradle, the maximum vertical lift height is 26 Inches from the floor. With a transmission sitting in the cradle, add around 16-19 inches of additional height, as measured from the bottom of the oil pan to the peek of the bellhousing and you get a total height in the vicinity of 45 inches. If I were to re-engineer this a second time I would put the rear casters on outriggers and create a square wheel base instead of one that, at present , is more of a triangle. A transmission raised to the max becomes very tipsy and unstable because the rolling base it is sitting above is essentially a triangle. Think of an engine stand on three wheels like some are made and you get a clear mental picture of what can happen with a heavy and clumsy component when you try to move it and it makes like the guy on the tricycle on the Rowan and Martin Comedy Show.

DSCN2834.JPG


And this is what makes moving things like engine blocks and transmissions a whole lot easier. if it looks sort of short, that is due to the outriggers being folded up and pinned in their sockets. Deployed, it actually rolls around on six casters. With this, the only thing I have done is to swap out the foreign born bolts and nuts for heavier american made items. I have no faith in a bolt marked "8.8" which I have been told works out to something around Grade 2. For the Metricated, there is also a 9.8 and a 10.9 which equate, sort of, to grade 5 and grade 8. I try to stay away from metric unless it is something inherent in the assembly. Case in point is the pan bolts for the 700R4. They take a 1/2 inch socket but they are actually metric and that socket can just as easily be a 13 mm one. Just as side note, the NAPA transmission jack was a dedicated unit and did have a four square wheel base. I left the back wheels alone on mine because, at the time, I could not come up with a design for the rear outriggers that i thought would be structurally safe and workable.

As always comments are welcome; raspberries have the round file waiting for them.

Oh, I did manage to locate a pivot for the TVS cable attachment up at the Fuel injection unit. Waiting on the manual I ordered to determine what the correct adjustment for cable tension is. I did go through this with my old 200R4 but it was a pain in the tookus and I had the correct instructions at that.


Nick
 
  • Like
Reactions: 5spdCab
Worked on the motor for my Pinto.
1) Replaced the timing belt and idler.
2) Replaced the 4 expansion plugs that are not blocked by the engine stand.
3) Removed the rear sump oil pan, replaced the oil pump, intermediate shaft, and pickup tube, installed the forward sump oil pan (will need to pull the pan off again in the morning because I forgot to drill out the plug for the forward dip stick hole for the forward sump pan).
4) Mounted the remote oil filter adapter on the engine block.
 
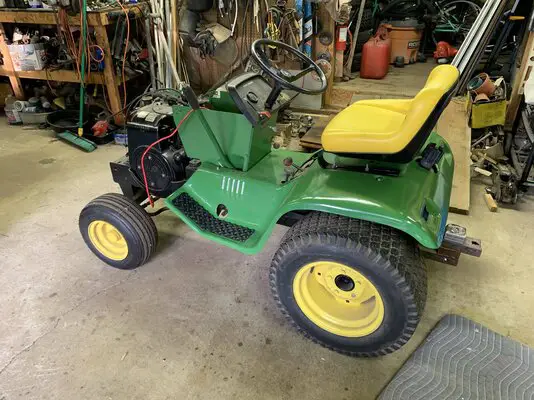
Got some puttering time in on my old John Deere 214. The generic replacement seat I bought a long time ago (long dormant project) had to be modified to work on the tractor. I got it set up this afternoon and installed a little while ago. The seating position is pretty comfortable and i’ll make adjustments when I get the pedals installed. The rebuilt engine has almost no run time so It’s due for a few laps around the property. It’s first job will be to drag a bunch of rocks from the front yard out behind the fence row for a brush burn pit. I installed the rubber step pads today as well, they look pretty good. Going to get the fiberglass hood sanded and painted before too long and get the nose back on. I have new decals for it and look forward to seeing it back together. It’s been sitting for a long time and will be nice having it ready to plow snow next winter.
EBB2F815-EE0B-4FA9-9AF0-BD94229FC60D.jpeg
 
And the pivot for the TVS cable, that I finally managed to locate, turned out to have a 5/16ths mounting stud; and the hole in the linkage turned out to be a 1/4 inch. Fortunately the speed shop had the correct sized item in stock and my ARP bolts for the bellhousing had just shown up so I l packed up the driveshaft for the G-10 and made a parts run. Dropped the d-shaft at the yard to get the universals punched out and new ones pressed in. They have hot red wrench access JIC that I do not. Too much wood and saw dust lingering around the saw deck for any peace of mind where open flame is concerned. Plus which, GM had a once upon a time habit of securing the bearing cups in their drive shafts with a length of nylon or plastic thread that ran around the cup in a groove. Heat was the only way to melt this nuisance out and get on with the pushing. They are supposed to call when it is ready but i may beat them to it and call myself first.

Oh, I did manage to mow the lawn, LOL.


Nick
 
Before continuing on the Pinto motor, I adjusted the fan belts on the Caballero.
On the Pinto engine, I pulled the pan off again and drilled out the plug for the forward sump dip stick, then reinstalled the pan, and plugged the rear dip stick hole. I bolted the exhaust manifold on snugly (didn't want to torque it down until I am certain that I don't need to take it off again), mocked up the intake manifold for routing the water hoses to the manifold heater and carburetor choke. This engine also a water jacket adapter that the stock oil filter screws to. My assumption is that it's an oil cooler, given that the engine was originally turbocharged, so I plan on taking advantage and routing the choke and manifold heater in line together with the oil cooler.
Happy with the progress I made today.
I purchased both left and right front disc calipers today. The master cylinder, and both rear wheel cylinders were ordered on Saturday, should arrive in a week or so. Still need to order a new clutch and pressure plate.
That's about all I can think of right now.
Have not yet checked/measured the driveshaft considering that I am swapping the transmission. So far, I know that the shift handle is only about 1/4-3/8" rearward of the original 4spd, I haven't checked the length of the tailshaft.
 
  • Like
Reactions: Texas82GP
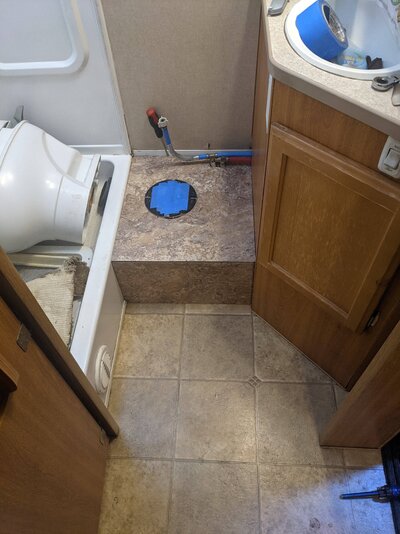
I'm not sure why Lance thought it prudent to put carpet under the toilet, but they did. We were sick of it stinking so I ripped it out. Turns out the shower wasn't doing the floor any favors either. Smart.

PXL_20210703_234158723.jpg


That luan goes under the cabinet. Since I wasn't in the mood to yank that I did the next best thing.

PXL_20210703_234253618.jpg


Once screwed down it's the ideal surface for some nice, cheap linoleum to stick to.

PXL_20210706_030511500.jpg


All buttoned up. So much better. This cost less than $30 too. Now the fan had also taken a dump, it was just a little weenie fan. A new $2 motor was $30, no thanks. The cheapest legit upgrade was $80. No thanks. But a 200mm computer fan on Amazon was $18, yes please. I chose blue and it makes for a perfect nightlight to take a whiz to.

PXL_20210706_030549635.jpg


All that and a healthy cleaning of the camper from head to toe. Next up is swapping out the blinds. Getting ready for a near month long stay in MI in August.
 

Attachments

  • PXL_20210705_015903245.jpg
    PXL_20210705_015903245.jpg
    1.4 MB · Views: 86
Status
Not open for further replies.

GBodyForum is a participant in the Amazon Services LLC Associates Program, an affiliate advertising program designed to provide a means for sites to earn advertising fees by advertising and linking to amazon.com. Amazon, the Amazon logo, AmazonSupply, and the AmazonSupply logo are trademarks of Amazon.com, Inc. or its affiliates.

Please support GBodyForum Sponsors

Classic Truck Consoles Dixie Restoration Depot UMI Performance

Contact [email protected] for info on becoming a sponsor