BUILD THREAD You know she's a keeper when...

Status
Not open for further replies.

Wageslave

Royal Smart Person
Jan 25, 2017
1,747
3,335
113
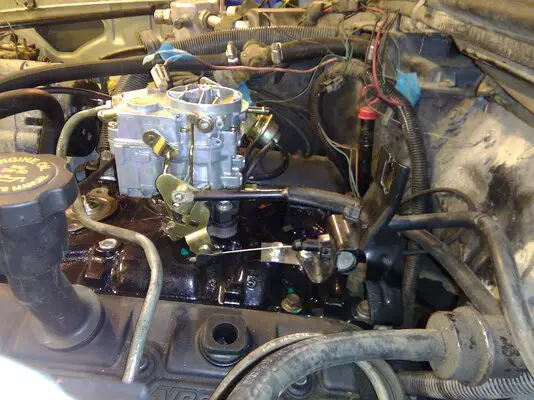
I got a good bit of stuff done today. I unbolted the fuel lines from the frame rail and spliced in the electric fuel pump. I also replaced the jumper line from the cross member up to the engine and connected up the carb. I pressure tested the fuel system and got fuel at the carb with no leaks.

For the fun of it, I hooked up that CCC converted distributor that I made to see if the engine would fire up. My distributor hold down from the old intake has a smaller hole than the bolt needed for the new intake, so I just set it in loose as a test. It actually fired right up and idled until the float bowl ran empty. The open manifolds were surprisingly not too loud either. I was super happy that it did not seem to have any issues or bad noises, as when I bought the donor truck I was not able to hear it run or even crank it over.

I still have to bolt the fuel lines under the car back on and wire the electrical for the fuel pump, but hopefully I am finished underneath the car after that.
 
  • Like
Reactions: 1 users

Wageslave

Royal Smart Person
Jan 25, 2017
1,747
3,335
113
The brown box man dropped me off a few presents today. I got a throttle cable bracket and a thermostat housing in today. I am still waiting on my distributor but since I got the economy shipping, apparently it is coming from California by wagon train (and the driver got cholera).

The thermostat housing went on with no issues, and should give me the correct angle to sneak the radiator hose through the serpentine belt between the alternator and the A/C compressor. Looks pretty sharp too.
IMG_20180313_004534.jpg IMG_20180313_005908.jpg

The throttle bracket originally came from a 88-94 V6 Silverado, but needed some modifications since the truck would have had angled intake bolts and this engine has the vertical bolts. I ended up using a bolt hole closer to the middle of the manifold on a small piece of stainless steel for the front hole, and a lot of clamping in a vice and hammering to form the back of the bracket to meet the back intake bolt. It looks fairly stock, except for the shiny piece of stainless. I still need to trim the excess length off the back of the plate, and form curves on the edges to add some rigidity.
IMG_20180313_003826.jpg IMG_20180313_005908.jpg

I could not come up with a good way to mount the cruise control diaphragm onto this bracket, but am going to try to mount it onto a bracket immediately behind the A/C compressor. Unfortunately those things are expensive, so it may be put off until other things are settled.

I did get the fuel lines buttoned up and the fuel pump wired. I used some 1/4" black nylon tubing as protection for the positive wire so it can run through the frame without being chafed. The fuel line coming out of the carb had to be rebent again to clear the thermostat neck, but all things fuel related should be complete now.

I have also been trying to get the dummy lights working and now have the voltage light working correctly, and the water temp light would work if I had a sender installed. There is no provision in the manifold for an extra temperature sender and the plugs in the heads are covered. I am probably going to have to get a tee installed the fitting under the thermostat housing. The oil pressure gauge will not light up at all, even with the two wires on the plug shorted together, so I may have a bad bulb in the dash.


I am going to try and get an upper radiator hose next and get the radiator shroud reinstalled next.
 

Attachments

  • IMG_20180313_004608.jpg
    IMG_20180313_004608.jpg
    974.8 KB · Views: 164
  • IMG_20180313_004558.jpg
    IMG_20180313_004558.jpg
    887.4 KB · Views: 159
  • IMG_20180313_003812.jpg
    IMG_20180313_003812.jpg
    1.8 MB · Views: 168
  • Like
Reactions: 2 users

Wageslave

Royal Smart Person
Jan 25, 2017
1,747
3,335
113
I did a lot of odds and ends work that did not feel like progress, but had to be done anyways.

I got an air cleaner base adapter that allows me to use my old Edelbrock triangle air cleaner with the 2 barrel, since it is the only thing that I have available that is small enough and low enough to clear everything. I still have my eye out for a factory 2 barrel air cleaner base, but it dropped a lot lower on the priority list.

I managed to rig up an upper radiator hose but I am not exactly proud of my work. There is a lot going on around the front of that manifold, and I have been having a hard time with the fuel line, the upper radiator hose, and the cruise control servo all wanting to occupy the same space. I foresee that loop that goes up and over the filler neck is going to be a huge pain to get air out of.

I also got the S-10 fan reinstalled, the fuel tank return line capped off, throttle return springs installed, and vacuum port caps installed on the extra ports of the carb.

The engine could use the timing dialed in a little better, but there is nothing to set timing with other than a TDC indicator cast into the block. Might have to convince myself to upgrade to a dial back timing light...

IMG_20180314_181153.jpg IMG_20180314_181126.jpg
 
  • Like
Reactions: 2 users

Wageslave

Royal Smart Person
Jan 25, 2017
1,747
3,335
113
A good bit of progress this week. The car only needs a A/C compressor and a belt to be ready for a test drive now.

I got the water temp light working and the cooling system is filled and mostly bled of air. I may end up going to a V8 radiator to make the cooling hose situation a lot less janky, but it should work for now.

The A/C compressor has been the one thing that I haven't brought myself to purchase yet, as they are a good bit of cash and I haven't sourced a compatible hose to hook the S-10 compressor to the Bonneville everything else. That is going to be a junkyard crawl more than likely. If I can't find anything reasonably quickly, I will just buy a bypass pulley and the non-A/C belt.

I did get the transmission filled with fluid and when I ran it through the gears I quickly found out that the hard lines to the cooler were not tightened when they were installed. Quick fix, but another annoying oil stain on the floor.
 

1evilregal

Comic Book Super Hero
Apr 23, 2009
3,056
4,357
113
Greensboro, NC
you may not be old enough to know this reference, but it was what popped up in my mind when you said the throttle bracket was coming on the wagon train...
diedofdysentary-t-shirt-tn-258x258.jpg


glad progress is going forward. am watching to see how well the 4.3 does vs. flemming's 3800, as these are 2 possibilities I may go with on the Regal project... I still have the 327, but really want something that'll have some reliability to it, and just don't have alot of confidence in the sbc, and do happen to have a 3800 on a stand in my storage, but thinking the 4.3 might be a little more stout with the factory SFI...
 
  • Like
Reactions: 1 user

Wageslave

Royal Smart Person
Jan 25, 2017
1,747
3,335
113
you may not be old enough to know this reference, but it was what popped up in my mind when you said the throttle bracket was coming on the wagon train...
diedofdysentary-t-shirt-tn-258x258.jpg


glad progress is going forward. am watching to see how well the 4.3 does vs. flemming's 3800, as these are 2 possibilities I may go with on the Regal project... I still have the 327, but really want something that'll have some reliability to it, and just don't have alot of confidence in the sbc, and do happen to have a 3800 on a stand in my storage, but thinking the 4.3 might be a little more stout with the factory SFI...
Oh man, I loved playing Oregon Trail on the Apple 2 when I was in grade school.

As far as the 4.3 vs. 3.8 debate goes, I think they both have their own merits. The 4.3 will probably win in torque, be a little behind in horsepower and lose in fuel economy if I was guessing.

I chose this engine mainly because I got a really good deal on it, and wanted to do something different. That being said, if you want to go 4.3 get one out of a 2000+ Blazer if possible as they are the 205 HP variant. Also head porting and polishing is recommended as all versions of these heads are turds for airflow, with the vortec heads sucking the least. I haven't even got to drive mine yet and already regret not pulling the heads and cleaning them up while on the stand.

Cams also wake these engines right up, but you will have to have the computer retuned.
Whatever project you choose, just have fun with it.
 
Last edited:
  • Informative
Reactions: 1 user

Wageslave

Royal Smart Person
Jan 25, 2017
1,747
3,335
113
So, after mulling it over I went ahead and bought the A/C bypass pulley and a serpentine belt. I actually got a non-A/C belt first, so I got the joy of a totally wasted trip to town. Put everything on and put a ratchet strap across the frame rails to hold the exhaust off the ground. Once it was safe-ish, I took it out for a test drive.

Oh damn, open manifolds are loud! My neighbor was standing on his porch and laughing his *ss off as I went by. I just took it for a couple mile trip around the block but it ran out pretty nicely. I did find that my thermostat housing was leaking some fluid out but a new thermostat gasket got it sealed up nicely. I also had to rearrange my vacuum lines, due to having the main HVAC vacuum line hooked to a ported vacuum port. They acted a little possessed.

I still need to get the radiator shroud installed, the oil light figured out, the hot air choke hooked up and a trip to the exhaust shop but otherwise she runs and drives.

From what I can tell, the 4.3 is a decent runner in this application. It had good torque and picked right up when you gave it some throttle. I only got it up to about 50 mph due to road conditions, but it got there smoothly and without complaint. It did start to die at idle due to the choke still being on when it was hot, but I have to get a length of copper tubing to hook this choke system up with.

I guess the next step is to clean the huge mess in the garage before I pull it back in but that is going to wait for another day.
 
  • Like
Reactions: 1 users

Wageslave

Royal Smart Person
Jan 25, 2017
1,747
3,335
113
I spent a little time tidying up under the hood and re-routing vacuum lines yet again. I wrapped up all of the computer wiring and zip tied it into a roll.
IMG_20180320_001105.jpg

I ended up stuffing it down by the A/C drier and it is out of the way enough for me to not worry about now.
IMG_20180320_002037.jpg

I also pieced together a different air cleaner, since my triangle one had almost no clearance between the top and the hood insulation. I was afraid that the insulation would suck down and cover the top up completely. That was not a great filter in the first place but covering the top of it up like that would probably stall the car out completely.

I did buy another 2 barrel air cleaner at the parts store, but the base was incorrect for a 3 1/8" carb. I went ahead and used the filter and top hat off of it, and set the filter directly onto the plastic air cleaner adapter. The flat surface seals up nicely, and gives me a little more clearance all the way around.

IMG_20180319_234243.jpg

Also, just for fun I made a short recording of it running in all its unmuffled glory while I was warming it up.

 
  • Like
Reactions: 2 users

Wageslave

Royal Smart Person
Jan 25, 2017
1,747
3,335
113
I got to spend the day working on stuff and getting a little driving time on the car, and got a little better feel for it.

I took it out on the highway for a 5 or so mile trip, and I think that the 4.3 is going to be a good fit for this car. It has 2.41 gears in it, so it is no rocket off the line, but it does get up to speed fairly quickly up 70 mph (for a V6). It was running wonky when I got back to the house, and found the screw for the choke rod bracket had backed out completely and was laying in a cubby hole in the intake manifold. A liberal application of blue Loctite should keep that from happening again.

My water neck has also been a source of frustration, as I just took it off for the 3rd time to get it to quit leaking. It has an O-ring that seals the neck to the flange on the intake, but it wouldn't seal tight enough to maintain pressure without a gasket installed. I bought a paper gasket and installed it, and it failed almost instantly due to getting wet from not having a flanged surface on the top side. I then went nuclear and bought the $20 reusable Mr. Gasket 738G silicone gasket. That finally stopped the leak. I finally located a correct for the application upper radiator hose, and will put it on as soon as I get another chance to get in the garage.

I also got the fan shroud installed and the EVAP canister hooked up.

While I was driving, my fasten seatbelt light finally turned on but would not turn off when the seat belt was fastened. It turned on again on my next trip when I honked the horn, but turned off again when the fuse blew. I don't really care whether it works or not, but blowing fuses is not acceptable.

I also noticed that the driver's side seatbelt has been changed to a dark blue one at some point in its life. Still works fine but now that I noticed, it is going to irritate me until it is replaced.
 
  • Like
Reactions: 1 user
Status
Not open for further replies.

GBodyForum is a participant in the Amazon Services LLC Associates Program, an affiliate advertising program designed to provide a means for sites to earn advertising fees by advertising and linking to amazon.com. Amazon, the Amazon logo, AmazonSupply, and the AmazonSupply logo are trademarks of Amazon.com, Inc. or its affiliates.

Please support GBodyForum Sponsors

Classic Truck Consoles Dixie Restoration Depot UMI Performance

Contact [email protected] for info on becoming a sponsor