Hood Hinges update

Status
Not open for further replies.
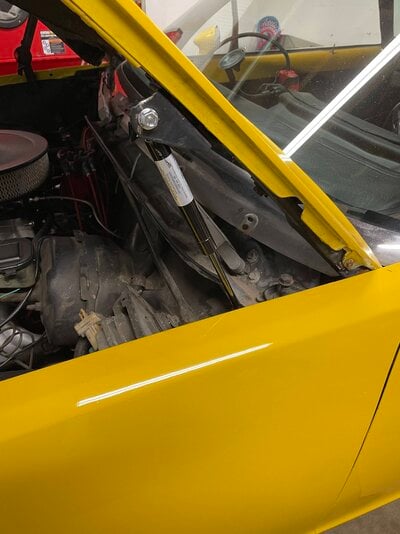
Got the first one on! Just keep in mine the lower attachment is not the same as where the normal spring is attached it mounts further back and up on the hinge itself 2C2B759E-B627-498F-8BDD-99786E34AD66.jpeg
 
Got the first one on! Just keep in mine the lower attachment is not the same as where the normal spring is attached it mounts further back and up on the hinge itselfView attachment 188503
More photos please.

Perhaps a couple of shots from the inside as well would be great. Are you using a ball and socket type post? If yes, then what size? And do you have the part number of what you're strut is?


Dang, I'm full of question lol. Almost like I want you to be the guinea pig 😉
 
More photos please.

Perhaps a couple of shots from the inside as well would be great. Are you using a ball and socket type post? If yes, then what size? And do you have the part number of what you're strut is?


Dang, I'm full of question lol. Almost like I want you to be the guinea pig 😉
So I used the same struts that melloelky posted Gas Struts

I then used these Balls Studs on both ends and used some nylock nuts I had around the garage. I will edit this post when I get off work with a few more pictures of the mounting of the struts.

All in all I think total cost was around $40
 
Last edited:
I’ve got the struts and ball studs ordered to retrofit my MC with the strut number that Scott gave me for a fiberglass hood. I’m in for the same money presently.

I’m looking for any pics I can find.

I have to say that those aftermarket hinges from CVF look great , but OMG are they salty.
 
I’ve got the struts and ball studs ordered to retrofit my MC with the strut number that Scott gave me for a fiberglass hood. I’m in for the same money presently.

I’m looking for any pics I can find.

I have to say that those aftermarket hinges from CVF look great , but OMG are they salty.
Ill see what I can do to show you everything I did. I still have to do the passenger side so maybe I can use that to take some more pictures. I cant bring myself to spend that much money on something that most people will never see unless you are at a show.
 
  • Like
Reactions: 64nailhead
Ill see what I can do to show you everything I did. I still have to do the passenger side so maybe I can use that to take some more pictures. I cant bring myself to spend that much money on something that most people will never see unless you are at a show.
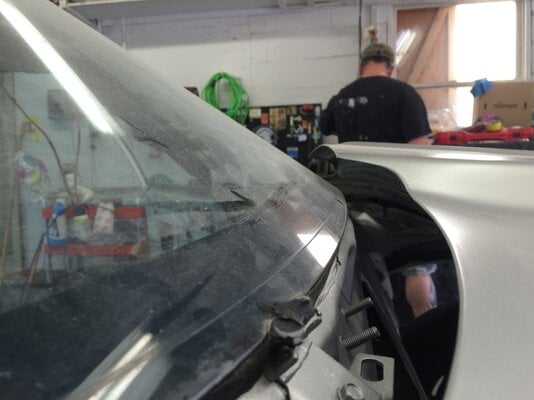
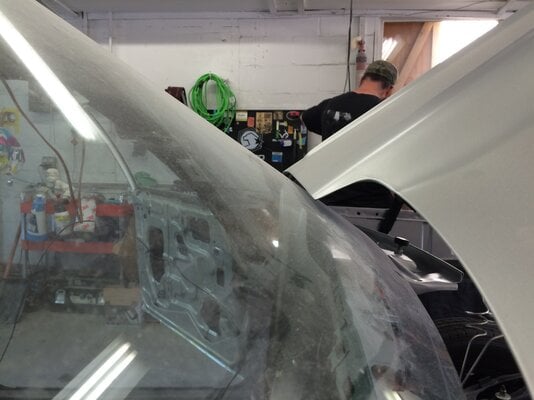
I'd like to see a picture showing the hood to windshield clearance from the side if you have time to do that. This is why I have to do something different. Love the shock idea but I might have to used a shorter one instead of an 11". I have to wait until Sat to get some help getting the hood back on.
 

Attachments

  • IMG_0176.JPG
    IMG_0176.JPG
    1.5 MB · Views: 110
  • IMG_0178.JPG
    IMG_0178.JPG
    1.1 MB · Views: 119
I'd like to see a picture showing the hood to windshield clearance from the side if you have time to do that. This is why I have to do something different. Love the shock idea but I might have to used a shorter one instead of an 11". I have to wait until Sat to get some help getting the hood back on.
If you want the hood to open to the factory position, then you’ll have to cut the cowl further than you have already.

It sucks, but ……
 
  • Like
Reactions: Sweet_Johnny
Status
Not open for further replies.

GBodyForum is a participant in the Amazon Services LLC Associates Program, an affiliate advertising program designed to provide a means for sites to earn advertising fees by advertising and linking to amazon.com. Amazon, the Amazon logo, AmazonSupply, and the AmazonSupply logo are trademarks of Amazon.com, Inc. or its affiliates.

Please support GBodyForum Sponsors

Classic Truck Consoles Dixie Restoration Depot UMI Performance

Contact [email protected] for info on becoming a sponsor