BUILD THREAD Rustier then I thought!!!

Status
Not open for further replies.

Rktpwrd

Builder of Cool Shjt
Supporting Member
Feb 2, 2015
4,197
24,126
113
Calgary, Alberta, Canada
And I'm definitely not trying to debate you friend. I'm glad he has your perspective on it. I just wanted to add mine. I don't think anyone can argue with the results that you get.

All good buddy, and thank you for the compliment.
I just felt the discussion went off track from what I originally wanted to warn him about. Felt I needed to highlight that so it didn’t get overlooked when the discussion turned to filler and epoxy.
 
  • Like
Reactions: 2 users

RabbitHoleSS

G-Body Guru
Dec 8, 2019
712
2,106
93
Indianapolis
My initial post to the OP was less about the debate on whether or not to apply filler over or under epoxy as both are acceptable. Rather, the emphasis was originally intended to be on making sure the areas he hit with the Clean n Strip wheel were properly and sufficiently profiled so that the filler will stick to those areas.

Just wanted to reiterate and make that clear.
I appreciate the tip. I didn't know filler needs that much tooth to adhere. That's a good bit of knowledge to have.
The humidity here during spring and summer is pretty thick. SPI (epoxy im using) recommends epoxy,filler, epoxy, 2k process.
But Doug and Donovan have helped me thru the whole project and been right on with their advice. Plus both their cars are top notch. I definitely understand why you guys do it that way. If it ain't broke, don't fix it. Truthfully, I'm still on the fence which way to go. I think the "old-school" way relies on mechanical adhesion, where the "new-tech" relies on a chemical bond. That's why the recoat times are so important. I really appreciate all the replies and input. Its invaluable.
 
  • Like
Reactions: 4 users

ck80

Moderator
Moderator
Supporting Member
Feb 18, 2014
5,757
9,167
113
All good buddy, and thank you for the compliment.
I just felt the discussion went off track from what I originally wanted to warn him about. Felt I needed to highlight that so it didn’t get overlooked when the discussion turned to filler and epoxy.
Dare we say that the conversation was.... going down the rabbit hole?

Ehhhh.... it's OK, I'll show myself out.
 
  • Haha
  • Like
Reactions: 7 users

RabbitHoleSS

G-Body Guru
Dec 8, 2019
712
2,106
93
Indianapolis
Man I was talking about sending my truck to the great scrapyard in the sky on Tuesday morning. Come Tuesday night after work it blew a tire on the highway in rush hour traffic. It was my best tire too.:rofl:
20210429_090054.jpg

More weight reduction.
20210429_090103.jpg

As ugly as it is, I've put close to 20k on it with no major issues except shame. Bless my sons heart he takes it like a champ. I'd have begged my dad to let me walk to school.
 
  • Wow
  • Like
Reactions: 4 users

ck80

Moderator
Moderator
Supporting Member
Feb 18, 2014
5,757
9,167
113
Man I was talking about sending my truck to the great scrapyard in the sky on Tuesday morning. Come Tuesday night after work it blew a tire on the highway in rush hour traffic. It was my best tire too.:rofl: View attachment 174221
More weight reduction. View attachment 174222
As ugly as it is, I've put close to 20k on it with no major issues except shame. Bless my sons heart he takes it like a champ. I'd have begged my dad to let me walk to school.
Back where I grew up you'd pull out a rivet gun and make layers of roof flashing down the side like shingles, then drape 3 or 4 full sheets of fiberglass over the bedside. Gets 4 to 5 more years...

Less work than the wood flat bed, but you only go there when you fall through the bed floor and the rubber mats no longer worked.
 
  • Haha
Reactions: 2 users

RabbitHoleSS

G-Body Guru
Dec 8, 2019
712
2,106
93
Indianapolis
I've been busy with life and lacking any real motivation to get out in the garage. I just plain didn't wanna see the car,let alone touch it. Vacation seemed to hit the reset button a little. Took my son to Clearwater Beach, adventure island and busch gardens. I got to see my little sister and dad too. Good times. My aunt Trina is a taxidermist, she was working on a white tiger.
20210614_105955.jpg

Since I'm about 1 month behind where I wanted to be, I've been trying to catch up. Just grinding out all the little stuff is killing me. It's Neverending. I think I'm done, then I find more. I had ospho on a few places so I had to neutralize it. Reapply ospho ,wash with water and red scotchbrite, hand dry then lock the panel to see if the acid is gone(I couldn't come up with a better way). Then I DA'd the qtrs with 80 grit.
20210617_201632.jpg

I've been wearing nitrile gloves since Texas82gp recommended it. No more random rust spots, panels were still clean after 2 weeks in Florida. Thanks again. I'll be wearing gloves from now on.
I decided against the epoxy first method, mostly because Rktpwrd said DTM, But I also didn't think I could get it all done in the recoat window. So I used 36 grit to give the panel tooth ,mixed up some tiger hair and slathered it on. I guess I didn't mix it well enough since it wouldn't cure, so I had to chip it all off.
20210619_210243.jpg

Watched the Kevin tetz tutorial on YouTube and went back at it. It's dry enough to sand in 15 mind. I used 36 grit on my medium block to knock it down and get my shape.
20210619_212942.jpg

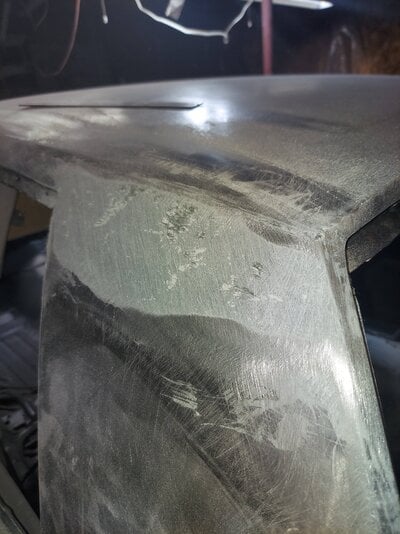
I chose tiger hair for this area because I was told it would be less likely to flex and Crack compared to all metal. It sucks to work with, especially for a newb. It goes on like jello, and I didn't get it thick enough causing those depressions. It also doesnt feather out like I expected. It probably needs more blocking before I move on. I'm hoping I can put filler or more tiger hair over it instead of grinding it all out.
20210619_223119.jpg

I thought I was done blocking this area about 4x, but after blowing off the dust I'd notice the edges were still raised. I forgot to take a picture but I ended up sanding off about half of the fiberglass left in the Picture below.
20210619_135603.jpg

I prepped the fiberglass and metal that I expected to use lightweight body filler in 36 grit too. The regular filler went on much smoother. I tried to force the filler into the imperfections on the first pass, then I pressed firmly the rest of it trying to make sure its thick enough. When I started blocking it I noticed the big high spot you see in the pics. I tried hammering it flat, my straight edge showed I turned the high spot into a low spot. Atleast I'll be able to fill it. I hope.
20210619_212956.jpg

I'm working under the assumption that there should be no filler on the edges, ex. Around the windows, where the roof skin is bent. And I'm profiling everything that's getting filler in 36 grit, until the finishing putty I was gonna switch to 80. Am I right in these assumptions? As for the roof, should I spray a light guidecoat ,block it and then apply filler where needed. Starting in the middle of the roof? I ordered the speed engineering headers/wires, white box oil pan, ICT mounts, Elgin 1840 and pac 1218s. The speed shop said they should have it all in by next weekend.The truck has been retired but the s10 I bought needs a driver fender,lights, core support and bumper to be road worthy. 400 for a running truck, I couldn't pass it up. I'm headed out to the garage, I'd really like to get the body in high build this week. Then I can turn my focus to the fenders, doors,trunk and hood. Should I rehang all of them to do the body work? Then take them off again and paint them? I was just thinking if I bodywork them separately, they might not line up. Happy Father's Day to all.
 

Attachments

  • 20210619_223119.jpg
    20210619_223119.jpg
    2 MB · Views: 100
  • Like
Reactions: 4 users

Doug Chahoy

Comic Book Super Hero
Nov 21, 2016
2,565
2,664
113
I always used Dura-glass after grinding down the Tiger hair, quicker and less work. I always had 24 grit longboard sandpaper for sanding the Dura-glass smooth. That would usually mean I only had to apply one coat of plastic. Here’s and old autobody trick if you don’t already know. When you open a new can of any type of body filler, the syrupy stuff you see is actually fiberglass resin. When you mix a batch of which ever kind, you can add some resin to your mix to thin it. I mostly do it for final coats. Less spot putty that way.
 
  • Like
  • Informative
Reactions: 4 users

RabbitHoleSS

G-Body Guru
Dec 8, 2019
712
2,106
93
Indianapolis
So add something like evercoats plastic honey to the filler? Even the tiger hair? I'll probably pick some up when I go to the supply store for quick sheets and some 2k foam for the roof supports. I'm hoping they know what I need, because I'm not sure.
 
  • Like
Reactions: 1 users
Status
Not open for further replies.

GBodyForum is a participant in the Amazon Services LLC Associates Program, an affiliate advertising program designed to provide a means for sites to earn advertising fees by advertising and linking to amazon.com. Amazon, the Amazon logo, AmazonSupply, and the AmazonSupply logo are trademarks of Amazon.com, Inc. or its affiliates.

Please support GBodyForum Sponsors

Classic Truck Consoles Dixie Restoration Depot UMI Performance

Contact [email protected] for info on becoming a sponsor