What did you do to your non-G body project today? [2022]

Status
Not open for further replies.
DSCN3513.JPG


DSCN3511.JPG


So back a few? pages or more ago, I mentioned that I would be fabricating a set of securing clips for my Bench One project. On the old bench, the hutch/shelf unit was held in place by gravity and inertia. For the new bench I decided that I wanted something more substantial by way of a physical connection between the hutch and the bench deck proper. What I dreamed up and fabricated is what you see in the two shots above.

The raw materials were short sections of angle iron that were cut from an old bed frame. No problem cutting and sizing them but when I went to cut and bend them for the angle, I found that what I was dealing with was cast steel and all the bends, like the one you see in the first picture, split open at the base. Nothing that a little bit of mig wire couldn't fix but which did require a little bit extra shaping and filing to look "finished". LOL

DSCN3510.JPG


In this third pic you can get a better sense of how the clip wraps around the base corner of the hutch. I did try to take a shot of the complete side so both the front and rear clips could be seen mounted in position but it blurred out and ended up in the deleted file. If you reference shots 2, and 3 they show the complete side anyway so nothing lost in the telling. The other corners are just mirrors of what you see.

The general intent is just to keep the hutch from sliding around if I ever have to move the bench; I did mention that it is on wheels at some point, didn't I??? In fact both Bench One and Bench Two are equally one wheels so they can be repositioned or shifted as needed.

This pretty much completes the saga of the benches. There will be no Bench Three for the forseeable future. No money, no wood, no room, no time. No, no, no, no, no, no, no. Did I say No??

Anyway...................................


Nick
 
  • Like
Reactions: Clutch and Streetbu
Project MasterBath Remodel....
stood there with coffee cup in hand, master of all I survey..... yep, it's going good. good thing I pay the experts to do the job 👍


1667762737805.png


1667762573771.png
 
Picked it up yesterday. Today cleaned the carbs, drained the tank, put 3 fresh gallons of ethanol free in, and fired it up.

PXL_20221106_224845873.MP.jpg

PXL_20221106_224913459.MP.jpg


Since I was alone, I wasn't able to clear it out. I need to fire it again and clear out the crank, but at least I know the rats that made a nest in the cover that was sitting on top of the seat didn't eat the seat itself or chew up any wiring. That and after sitting for 7 years it wasn't seized. I'd left it with the guy I bought it from back in 2003 and he stuffed it into a 48ft container back in 2015 when I last rode it. I'd hit him up last fall realizing the motor may have seized after sitting so long, he thought the seat had a hole chewed in it, and I decided to bring it back with me to CO. It needs a little cleaning up, but really is no worse for the wear.
 
No Sh*t? Really??😀.


And those measurements you were interested in are posted just above.

Nick
 
  • Like
Reactions: ck80
Huh! So I wake up and Hey, hey lookie here.

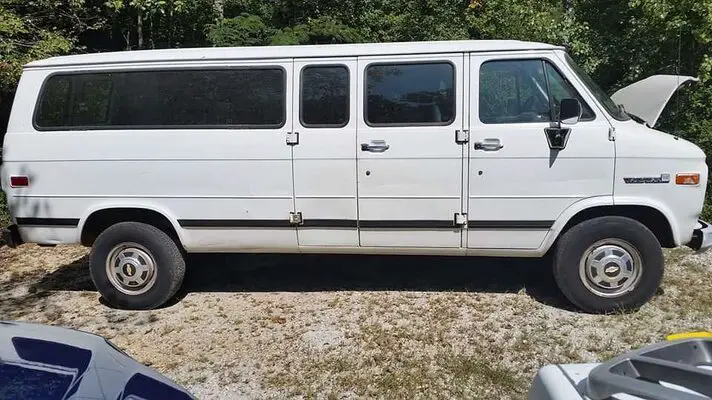
CK80, how fast do you need that measurement? And, if it helps any, my 1980 standard body G-10 Van fits just nicely side to side on a ro-ro or dolly hauler; found out the hard way this summer when I dumped a U-joint in heavy traffic.

I will be heading into the shop briefly this afternoon and can put a tape to the rear end, wheel outer to wheel outer. My rims are not steel but they are GM factory aluminum; came from a Vandura conversion ??? decades ago, so the offset/backset for them is pretty much GM stock. What I can do is take a measurement for both ends, front width and rear width. That could give you what you need if you are using the steel stockers. I do know that they are 15x7 and 5 bolt/five inch and will also fit my S-10. I can also get you an axle to spindle length for it jic.

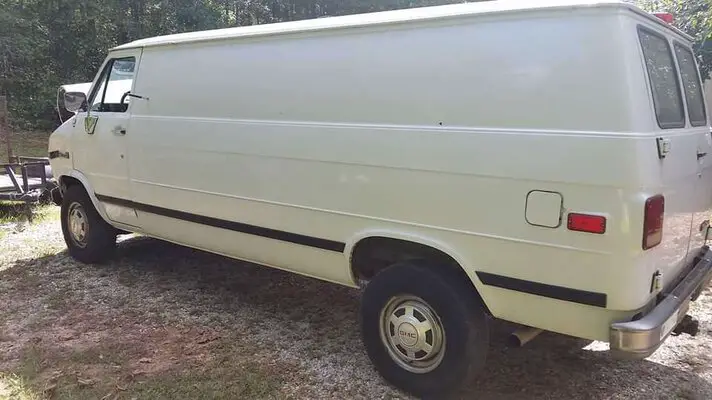
As for the whole history bit. GM vans came in short, standard, and extended wheel bases. You don't see much of the long body units; they mostly went to commercial and industrial purchasers and got worked to death as technician vans. Mine actually spent five years hauling candy and confectionary/vending syrups for a vending company. I knew the back history of it from the day it came to the branch to the day it was surplussed and put up for sale. I wanted a van for long range operations so, score. Went to Sturgis, among other places, quite a number of times in it and it made a better combination bedroom/bar/shop than a tent on the ground.

The model designation is actually also the GVW weight capacity as well. G-10's were a 1/2 ton load rated, G-20, a 3/4 T and G-30, the 1 ton.

If you had a GMC instead of the Chev, the models were G-15, G-25, and G-35, but the load ratings were the same.

After the mid 90's things got kind of murky and the vans got renamed Savanna(h) or something like that. They were already fitted with the Vortec motor by around 86 or so. Body-wise, apart from the cosmetic aspect of it all, the physical shape remained about the same until some time in the early to mid nineties.

Anyway, yeah, I think I can get you that measurement some time today, works for you????


So some time today proved to be more or less immediately.

For my van the wheel base is 125 inches, rear axle centre to front spindle centre, +/- maybe an inch. This was a do it myself alone exercise and the precision may be suspect.

For the front and rear, the measurement for wheel width, taken from the outside of the tire, to the outside of the tire,
is 79 inches at the front, and 79 inches at the back. Again, this is a plus measurement, meaning that it could be a little narrower but no wider. If i've erred, it is on the side of generosity. I'd rather go slightly wide and give you wiggle room than go tight and have the vehicle hang up or jam during loading. My rims apparently all possess the same offset; the back tread is wider but the width is to the inside and doesn't alter the overall track.


This what you needed??


Nick

No Sh*t? Really??😀.


And those measurements you were interested in are posted just above.

Nick
Much appreciated. And yes, exactly what I was looking for.

Mine is a G3500, a 1994 so it's one of the last of the good ones. It's a bit of an oddball. Full glass package on one aide of the truck, no glass on the other. The normals here are either no glass at all, or, full windows ala people mover. Had the extended wheelbase of ~146 inches. As far as uhaul will be concerned I'd be calling it a g10 since there's no badges and no registration currently, but, here as long as the dolly is tagged you can have up to two wheels down on a non registered vehicle as far as DOT is concerned. Use a tow bar it's required to be registered though. So I figure drop the driveshaft, zip tie it to the frame rail so the trans doesn't puke its guts, and front wheels on a dolly.

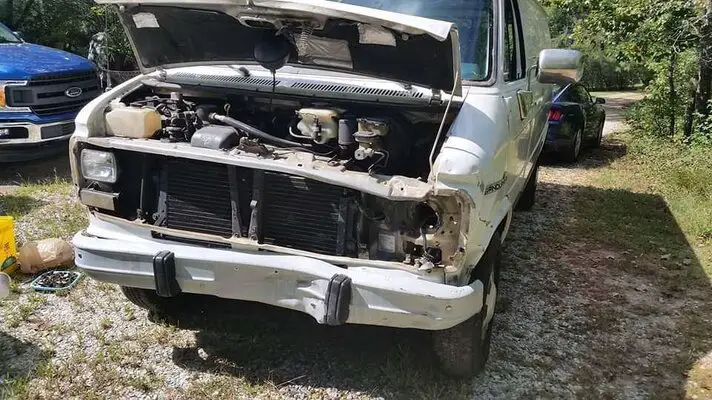
Started life as a bank document truck for about a dozen years, then was retired with 99k on the clock. Bank employee bought it for store runs and such, only put 20k on it in the next 10 years himself. He lost 2 hubcaps and put chebby ones pn one side, but, i didnt even notice until he told me. Unfortunately, someone made an illegal turn directly into the front of the truck from about 2 car lengths away in a 45mph zone. No way to stop or do much of anything. So, driver fender is very messed up, the core support of which there isn't much of anything on these took a bend, but, the rest wasn't that bad. I've kept it parked since end of 2018 no, never had time. Always was a 350/4l80e donor and water tight storage in a worst case scenario for me. Also had 4.10s. Then in 2020 a local guy sold me a bumper assembly, grill, bezels, hood, core support top plate, and just because, 2 doors for $75 combined. Sold the doors for $200 and stashed the rest. I figure if stuff shifted underneath too much it'll be wind and water tight storage for the wife's teaching excess. If not, maybe I'll deal with the hassles of the salvage rebuild.

Door is slightly off on gap on driver side close to contact closing but still isn't into the jamb. So, that welded on fender definitely moved backwards a smidgen, but, may not be too bad. The year old jeep pos suv was totalled on scene.

Either way, with 135k on the clock the drivetrain has another 150-200k miles in it. Just would be a shame for such a clean and lower mileage unit. Don't make em like it anymore.

131929199_10104405016259044_4265652160859423733_n.jpg

132085260_10104405016503554_5737025307432067721_n.jpg

132110134_10104405015814934_781578045113382379_n.jpg
 
  • Sad
Reactions: Texas82GP
Some of their work looks good, but, their choice of toilet installation location is suspect 😆
don't complain, the second owner of the house put carpet EVERYWHERE. yes, even in the toilet space where it covered up the cheap vinyl.
 
  • Wow
Reactions: Texas82GP
COOL. Glad to be of service.

Yeah, you could tow it the way you've suggested. Only thing I would be doing to the drive shaft as well is to run a couple of turns of tape around the rear U-joint to keep the cups from escaping and, either stash the bolts and retaining plates for the rear joint to yoke connection somewhere safe where you will inevitably forget where they are 😀, or just re-install them on the yoke and make the bolts are tight. For strapping the shaft up, load rated bungie cords, the blue rubber ones, would work but I would back them up with some heavy gauge mechanics wire or some of that perforated plumbing strapping just to be safe.

The other thing would be to score a set of those magnetic-mount stop/turn signals and hang them on the back of the van so the moron who will inevitably be tailgating you will have a secon or two to regret his/her life before customizing the body metal on the back of your van. If it happens to have a receiver hitch mounted, you could arrange to plug a 2 inch tow ball into place just as a surprise. The lights are the same as what is on a normal trailer and use the same plug style connection. It beats having the four ways on in the van as it doesn't drain the battery or cause eplipsy or road rage for the mook who is behind you.

As for the fender. there is some kind of van forum out on the west coast that might be able to put you in touch with a source for them. The spare I scored came from a paint supply shop. They had bought and used it as s demonstration panel and were just going to get rid of it as they were moving; so I made them an offer they didn't refuse.

While rare as you say, I have seen them built that way a time or two. As you suggest, as a service or parts van, or even as a salesman's moble display unit. Being as long as it is, it would make a good camper/bar/micro-shop for attending events like week end swap meets or doing some out of state parts hunting.

I threw an air mattress into mine and slept like a baby. Had the tool chest and ice chest back behind rear doors along with a baby BBQ and good to go. Even set it up with a third chair mount that I could swap out for a removable barrier that I could butt the front wheel of a bike up against when setting the ratchet straps. Piece of 2x4x10 played the role of loading ramp.

You got kids or grandkids, the whole soccer or baseball team would fit right in and still have room for treats for them and wobbly pops for the adults. Take 'em camping and you have a refuge if it rains.


Nick
 
  • Like
Reactions: ck80
COOL. Glad to be of service.

Yeah, you could tow it the way you've suggested. Only thing I would be doing to the drive shaft as well is to run a couple of turns of tape around the rear U-joint to keep the cups from escaping and, either stash the bolts and retaining plates for the rear joint to yoke connection somewhere safe where you will inevitably forget where they are 😀, or just re-install them on the yoke and make the bolts are tight. For strapping the shaft up, load rated bungie cords, the blue rubber ones, would work but I would back them up with some heavy gauge mechanics wire or some of that perforated plumbing strapping just to be safe.

The other thing would be to score a set of those magnetic-mount stop/turn signals and hang them on the back of the van so the moron who will inevitably be tailgating you will have a secon or two to regret his/her life before customizing the body metal on the back of your van. If it happens to have a receiver hitch mounted, you could arrange to plug a 2 inch tow ball into place just as a surprise. The lights are the same as what is on a normal trailer and use the same plug style connection. It beats having the four ways on in the van as it doesn't drain the battery or cause eplipsy or road rage for the mook who is behind you.

As for the fender. there is some kind of van forum out on the west coast that might be able to put you in touch with a source for them. The spare I scored came from a paint supply shop. They had bought and used it as s demonstration panel and were just going to get rid of it as they were moving; so I made them an offer they didn't refuse.

While rare as you say, I have seen them built that way a time or two. As you suggest, as a service or parts van, or even as a salesman's moble display unit. Being as long as it is, it would make a good camper/bar/micro-shop for attending events like week end swap meets or doing some out of state parts hunting.

I threw an air mattress into mine and slept like a baby. Had the tool chest and ice chest back behind rear doors along with a baby BBQ and good to go. Even set it up with a third chair mount that I could swap out for a removable barrier that I could butt the front wheel of a bike up against when setting the ratchet straps. Piece of 2x4x10 played the role of loading ramp.

You got kids or grandkids, the whole soccer or baseball team would fit right in and still have room for treats for them and wobbly pops for the adults. Take 'em camping and you have a refuge if it rains.


Nick
It did have the factory tow hitch on the back, with the oversized receiver. and we do have a set of those magnetic harbor freight tow lights. Unfortunately, the last trip out went over one bump and BOTH red lenses fell off at the same time, just the plastic cover. Leds and wiring all intact. Some kinda weird quality defect I'd suspect from having spent too much time in the sun. If I see something cheap to glue on I will, otherwise I'll just put that old translucent red tape people patched taillights that were cracked with back in the day.

The top of the fender on that side is still straight/normal, so, I'm hoping for either a slide pull dent remover after drilling some holes then bondo it, sort term. Long term maybe a replacement gets sectioned in as a patch panel. Removing the glass, door, and all the other work that a full on replacement to where the factory welded the body is a bit much, at least for now.

Or, maybe it'll just sit out back near the barn/shed until I get time. Probably have about 2 dozen irons in the fire right now, but, this thing has been stored in a rented parking spot out near Atlanta for a while now so I'm ready to move it - plus I'd like the chainsaws and fruit tree logs that are currently stored inside....

It would have more room than the yukon, although, we sleep well enough in that as it is at the swap meets. Pull a homemade redneck trailer of junk to sell and then park next to it, sleep right in the slot for the night(s). Idea situation would be take them both. It's rough enough that I don't mind modifying anything in it or on it, but straight enough I think it's worth salvaging as long as the underneath isn't bent up too bad - something I really can't diagnose until I get it here and in the air a bit...
 
Status
Not open for further replies.

GBodyForum is a participant in the Amazon Services LLC Associates Program, an affiliate advertising program designed to provide a means for sites to earn advertising fees by advertising and linking to amazon.com. Amazon, the Amazon logo, AmazonSupply, and the AmazonSupply logo are trademarks of Amazon.com, Inc. or its affiliates.

Please support GBodyForum Sponsors

Classic Truck Consoles Dixie Restoration Depot UMI Performance

Contact [email protected] for info on becoming a sponsor