What Did You Do To Your G-Body Today? [2022]

Status
Not open for further replies.

SS_Malibu

Royal Smart Person
Supporting Member
Sep 27, 2021
1,172
2,058
113
Mesa, AZ
Finally took a beautiful Saturday morning to play some Metal in the garage at unreasonably loud volume levels. Then used the Electric glue gun to hang the exhaust a little better on the Regal. I managed to avoid staring into the pretty blue light long enough to slam this low effort mess-terpeice together.
View attachment 201152
View attachment 201153
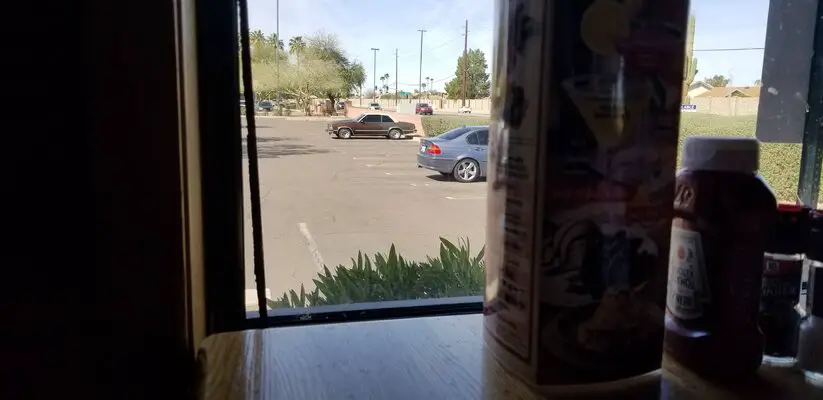
Then proceeded to take the car out on a lunch date. Even if it looks like this you still gotta sit somewhere you can see your car for a wrap and a brew.
We then took it out to the driving range well just because. Basically any reason to drive this thing around today and I was gone
View attachment 201154
What a Geek!
However, if you look in the background of this picture you might see a brown Malibu watching me and my wife eat lunch. It's almost like that seating was planned. Wink Wink.
 

Attachments

  • 20220227_111134.jpg
    20220227_111134.jpg
    509.5 KB · Views: 57
  • Like
  • Haha
Reactions: 3 users

CopperNick

Comic Book Super Hero
Supporting Member
Feb 20, 2018
3,362
3,021
113
Canada
The factory solution was to double the return springs so you had an "innie" and an "outie". I have harvested various versions of this combination and found that from pair to pair they can have differing spring tensions. With that in mind you can slip the innie out and swap it for another, slightly heavier or lighter and tweak your return speed that way.
 
  • Like
Reactions: 1 users

MrSony

Geezer
Nov 15, 2014
6,832
6,741
113
Des Moines, Iowa
The factory solution was to double the return springs so you had an "innie" and an "outie". I have harvested various versions of this combination and found that from pair to pair they can have differing spring tensions. With that in mind you can slip the innie out and swap it for another, slightly heavier or lighter and tweak your return speed that way.
That was my plan. Now I have new things to pocket at the yards.
 
  • Like
Reactions: 1 user

Rktpwrd

Builder of Cool Shjt
Supporting Member
Feb 2, 2015
4,171
23,921
113
Calgary, Alberta, Canada
Drove it. Cruised it. Flogged it. Made really cool engine and tire screeching sounds with it. Pi$$ed off my neighbors with it. Enjoyed the $hjt out of it.

C532E23E-177A-4F47-9B9A-B189A4C30A9D.jpeg


244C2D19-5A2F-4B67-846C-52A0F885375E.jpeg


D59E6A35-B4B9-4333-8165-3985841ECB0A.jpeg
 
  • Like
  • Winner
  • Haha
Reactions: 14 users

MrSony

Geezer
Nov 15, 2014
6,832
6,741
113
Des Moines, Iowa
Fanbelt decided it couldn't take it anymore and shredded on my way to work. What a sight to see the temp gauge pegged on the right side of 100*f. Pulled off at the nearest exit, surveyed the damage.
IMG_20220625_174357424.jpg
IMG_20220625_174400529.jpg
IMG_20220625_174416056.jpg


Belt was hanging on the alternator and it barfed 1.75 jugs of coolant everywhere because the overflow tank is a little melty and doesn't seal at the cap. Put what was left of the old belt back on and got to an AutoZone and bought a belt. Since I was already late to work I stopped for tacos. Only an hour and a half late. :D
 
  • Like
  • Wow
Reactions: 4 users

gbodytoys

G-Body Guru
May 1, 2014
504
650
93
Detroit, MI
I can tell you what I DID NOT do today, change the freaking belts on my Regal.

I thought that I liked to work on cars until I met the V-belt system on a Oldsmobile 350 rocket. I'd GLADLY pay someone $100 to do this nonsense. My Chevy engines never treated me like this.
 
  • Haha
Reactions: 1 users

Built6spdMCSS

Geezer
Jun 15, 2012
5,804
9,715
113
Florida Beach
I can tell you what I DID NOT do today, change the freaking belts on my Regal.

I thought that I liked to work on cars until I met the V-belt system on a Oldsmobile 350 rocket. I'd GLADLY pay someone $100 to do this nonsense. My Chevy engines never treated me like this.
Modern serpentine belt setup is nice, happens to have more power behind it too. :)

FBODY ACCESSORIES.jpg
 
  • Like
Reactions: 1 users

motorheadmike

Geezer
Nov 18, 2009
8,976
27,522
113
Saskatchewan, Truckistan
Cleaned it up and took it to do cool Dad stuff with my girls.

PXL_20220626_173345081.jpg
 
  • Like
  • Winner
Reactions: 11 users

CopperNick

Comic Book Super Hero
Supporting Member
Feb 20, 2018
3,362
3,021
113
Canada
Managed to remember to bring the camera with when I went out to the shop just after brunch.

DSCN3283.JPG


DSCN3275.JPG


DSCN3276.JPG
DSCN3277.JPG


DSCN3278.JPG


So this is where my adventures in recreating my driver's door have led me. At this point all that is left is the color shot. The red primer is an experiment to see if the final color dries brighter than it would with a grey primer instead. The greys can be lightened depending how much thinner is added but too much thinner and you risk the dreaded runs as well as having to apply more coats to get a solid coverage. Like I said if this works then I may score a gallon of the red and use it to jamb the whole car as the various panels get completed.


DSCN3279.JPG


DSCN3280.JPG


DSCN3282.JPG


This is sort of a post mortem as this used to be the dolly assembly that cradled the rear end for my Monte. it has now been reduced back to its components and my chassis dollies are once more free to be used for car moving. The actual cradles that supported the brake drums (ref: previous shots of the cradle doing it's job) are going to remain assembled; one does need to be repaired but that can be a winter to do thing. They pretty much match all the rear ends that presently comprise my inventory so keeping them as is makes sense??


DSCN3284.JPG


DSCN3289.JPG


The keen eyed are going to notice the diamond shaped applique on the outer frame rail just aft of the kick down. This was the attachment point at which I amputated the old rear frame horn and installed a new replacement. The old horn was well beyond repair; most of it gone almost half way up the sides. A combination of yearly salt water showers plus the condensation coming off the exhaust pipes when they were attached to the frame horns due to an under the bumper rear exit design did the driver's side in almost completely. There are no shots of this project as it predates me taking pictures of things that have been visited. However, by way of summary description, the horn is not just butt welded in place. It has inner panels that were plug welded to it and which bridge the seam on the inside. They are also plug welded to the accepting socket that I created for the horn when i was fitting the whole business together. Once I had inserted the frame horn and got it properly located and aligned, the plug welds were burnt in to create the initial connection and then the edge. butt seams were burned in to make the connection solid. Once that was all done, it was all ground smooth and the diamond was cut from flat plate and laid over the seam to span it equally in both directions. It got drilled for plug welds and then both the plugs and a perimeter pass was used to make it permanent. For the, "that ain't so pretty, WTF?? critics, all this work was done out ion a back yard driveway during high summer. No shelter. My welder was a 220 Lincoln Wire Feed that i had had to set up for flux core because C-15 gas is useless out in the open; the wind just blows the lens away. And I still have that Lincoln and it is still set up for Flux Core!! Ya just never know...............


DSCN3288.JPG


And last, for now, the rear end assembly, back in place and just sort of hanging around. The shocks are the KYB's from Summit that my local "Yeah, we have 'em" shop didn't when I was finally able to visit them. You can also just see in the first shot, one of the new upper Hotchkis poly U bushing assemblies. Finally having a master bushing and ball joint pressing kit was the impetus for pulling the rear end in the first place. Prior to acquiring that, I had no real method available to me to dig the factory corpses out of their graves. There are pictures from last posted to this thread of what it took to extract the old bushings; think air drill and several large drift punches. The replacements from Hotchkis had been imitating popsicles in my downstairs freezer for maybe as much as a decade or more!!

The last shot is the rear anti-sway bar, waiting patiently to be re-installed. That was part of the today agenda but didn't happen because I found some surface sitting bubble rust on the inner faces of the control arms where the mounting bolts go through. Elected to wire wheel the corruption off and apply a coat of POR-15 to the surfaces to seal them up prior to stuffing the bar back in. The metal to metal surfaces where the bar sits against the arm is a good place for moisture and crud to accumulate which, over the years, likely led to the enamel finish on the arms being damaged.

Just in passing, one of the door shots shows the freshly rebuilt hinges bolted into position. Once the jamb shot goes down and dries, the next step will be to jamb the A and B pillars and hang the door again. No picture of it to show but I do have an adapter for my one floor jack that lets me cradle a door and lift and manipulate it into position to remove and rehang it. Made doing the driver's door hinges on the S-10 a LOT simpler to work with as those hinges are permanently attached to the A pillar and not available for removal in case of pin and bushing swaps.

Still to do are purging the brake line with compressed air before I make the connection to the rear end Tee, rehanging the parking brake cables, and rehanging the exhaust dumps, along with tweaking the alignment of one of the mufflers to get it laying flat.


Some fun, Huh, Bambi??


Nick
 
Last edited:
  • Like
Reactions: 2 users

oldsmobile joe

Royal Smart Person
Nov 12, 2015
2,067
3,053
113
mpls
I can tell you what I DID NOT do today, change the freaking belts on my Regal.

I thought that I liked to work on cars until I met the V-belt system on a Oldsmobile 350 rocket. I'd GLADLY pay someone $100 to do this nonsense. My Chevy engines never treated me like this.
Wish you were local. Easy money.
 
Status
Not open for further replies.

GBodyForum is a participant in the Amazon Services LLC Associates Program, an affiliate advertising program designed to provide a means for sites to earn advertising fees by advertising and linking to amazon.com. Amazon, the Amazon logo, AmazonSupply, and the AmazonSupply logo are trademarks of Amazon.com, Inc. or its affiliates.

Please support GBodyForum Sponsors

Classic Truck Consoles Dixie Restoration Depot UMI Performance

Contact [email protected] for info on becoming a sponsor