What did you do to your G-Body today? [2011-2018]

Status
Not open for further replies.
I looked my hood up....estimated weight is 30lbs. I would say the struts for glass hoods should work for aluminum hoods.
thank you, thought provoking. i'll look into it.
joe
 
Replaced the fluid in the diff and fixed the bad transmission gasket.
 
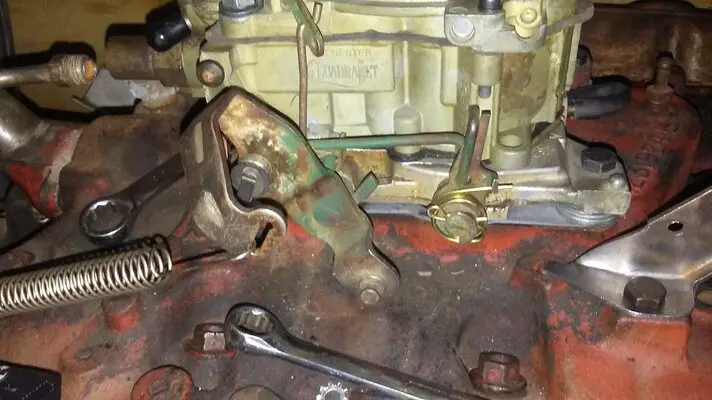
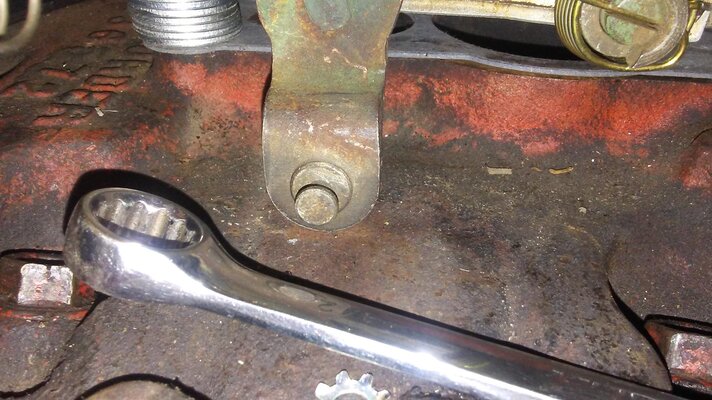
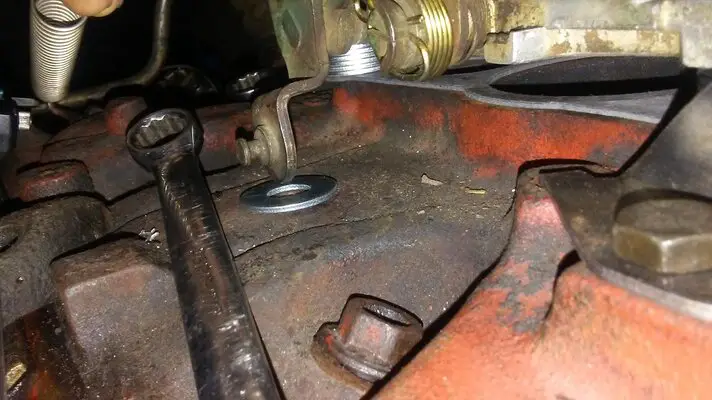
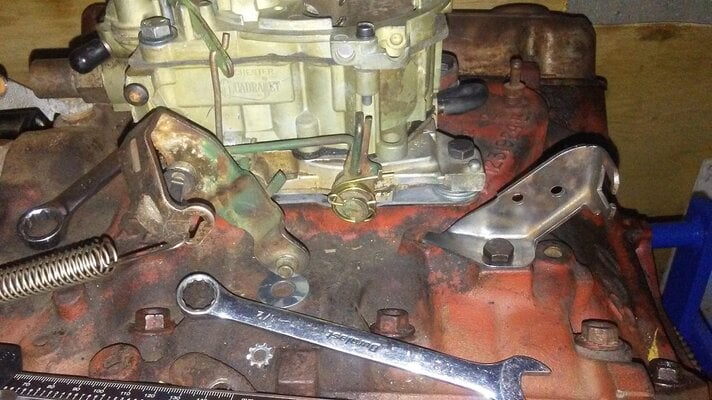
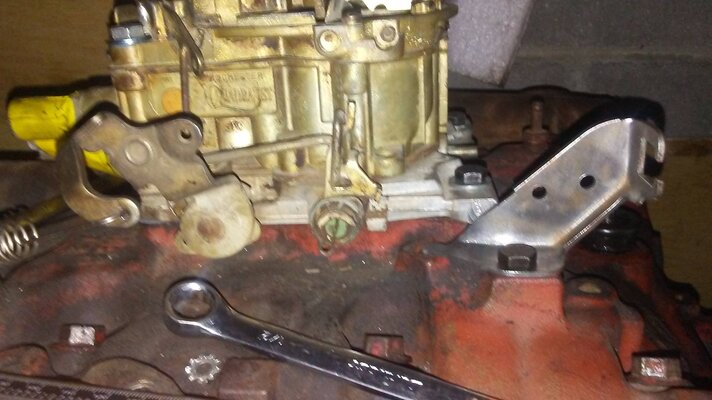
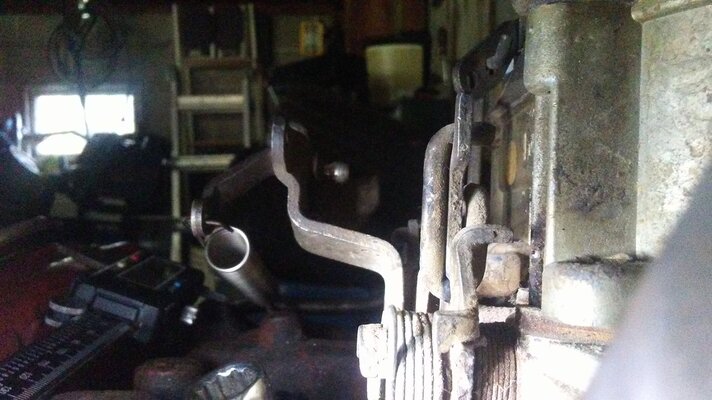
I got the correct throttle cable bracket for my 350 SP motor in the mail Friday and I installed it promptly. Looks pretty damn nice, guy shined it up a bit. Contemplating degreasing and clearing or painting it black. I like some bling here and there, but black is always cool. Also ran into a conundrum. Pre '75 models (all GM afaik) use linkage from the pedal directly to the trans to downshift whereas the 75 up models (again, afaik) used the cables we all know and loathe that attach to the throttle arm on the carb. Therefore the older model carbs do NOT have the extra stud for the kickdown cable on the throttle linkage. "Why not just swap another carb on and/or another bracket" you may ask. Well, I have tried. Every style of quadrajet (save for early Buick) has the throttle arm dangling down below the throttle bladed for some reason and this is a problem for me. And I refuse to run anything other than a qjet. The Buick intake for this particular vintage has the carb pad damn near 100% level with the rest of the intake. No plenum at all. Therefore, the throttle arm of any quadrajet (even my favorite for Buick engines, the 800cfm 17058241 ['78 350 specific]) hits the intake pretty good. Either no throttle or all of the throttle. No dice. I know spacers exist, but didn't know what size I should get. Too big, geometry off. Too small, carb linkage still hits. I took the '70 carb off, grabbed some washers, my cheapo chinese digital calipers, and sat the 17058241 on my intake on the washers after measuring out that 7 of them were .486 inches tall. Close enough. Turns out, a 1/2 inch is the space needed for the newer style carb to clear the intake. On the new carb it has the clip style throttle cable mount (older has ball stud mount) and the extra nub for the kickdown cable. The washer under the arm is 1/16 thick, so there is a teeny-tiny bit more than 1/16 clearance between. Plus the spacer will require two gaskets, so there will be a tad more clearance. Also, gonna fab up a little dongle that'll bolt on the two holes on the bracket to hold the kickdown cable. Thinkin of maiming one of the spare chevy brackets I have to accomplish this... I love being a hotrodder. Turns one into an engineer if only for about 20 minutes. 😛 Pictures show what I done did and the uh, levelness (that's a word?) of the new carb vs the bracket. Also, took a rather cool picture of the throttle stud of the old carb through the throttle cable bracket hole. Man that's a lot of words. I'm just oddly pumped about this I guess. I may be at a stand still funding the project but any progress is good progress dammit.
 

Attachments

  • carb1.jpg
    carb1.jpg
    224.5 KB · Views: 147
  • carb2.jpg
    carb2.jpg
    281.8 KB · Views: 136
  • carb3.jpg
    carb3.jpg
    338.3 KB · Views: 157
  • carb4.jpg
    carb4.jpg
    257.3 KB · Views: 146
  • carb5.jpg
    carb5.jpg
    413.8 KB · Views: 145
  • carb6.jpg
    carb6.jpg
    205.4 KB · Views: 144
  • carb 7.jpg
    carb 7.jpg
    421.6 KB · Views: 146
  • Like
Reactions: mr evil
Well I'm back on prepping my quarter windows for the 2nd time with some SEM trim black. The 1st go around I followed SEM's directions and didn't use adhesion promoter. Needless to say, the paint didn't stick.

So after learning my lesson, and using SEM on a bunch of stuff since, I am scuffing the trim again. I will clean them and tape them up, and hopefully have success this time around. I should have them done in a bit.

Before....
20170730_100233.jpg
 
  • Like
Reactions: Texas82GP
My amp will shut down when the volume is way up so I change my cap that was bulging and replaced the wiring including the ground with a new cap. I use my test light to drain and charge a cap. So I grabbed one of my test lights to drain the old cap and was standing there waiting for the light to go out. I waited longer than I should for the light to go out........then it dawned on me, I was using the test light that has an led.....:rofl:
 
trans wouldn't shift pass drive... removed the cable the shifter shifts all gears, checked the trans sure enough it's inside, drop the pan to find two bolts from the valve body in the pan and the 3rd half way off blocking the shift linkage....
IMG_3944.JPG
IMG_3945.JPG
 
I took a little drive to meet axisg and his son and grabbed a coffee. I had his horn gaskets that were ordered along with the gaskets I needed so I gave them to him today. He overpaid me which I unsuccessfully tried to return to him. It was great meeting another member and his son who has an El Camino. They were headed off to a local to me scrap yard so I hope they found some good parts.
 
Status
Not open for further replies.

GBodyForum is a participant in the Amazon Services LLC Associates Program, an affiliate advertising program designed to provide a means for sites to earn advertising fees by advertising and linking to amazon.com. Amazon, the Amazon logo, AmazonSupply, and the AmazonSupply logo are trademarks of Amazon.com, Inc. or its affiliates.

Please support GBodyForum Sponsors

Classic Truck Consoles Dixie Restoration Depot UMI Performance

Contact [email protected] for info on becoming a sponsor