

Sean's 78 Camaro Z28
- Thread starter Texas82GP
- Start date
You are using an out of date browser. It may not display this or other websites correctly.
You should upgrade or use an alternative browser.
You should upgrade or use an alternative browser.
I was wondering what that wasforget the malibu, I'm digging the IH behind them!
Vote for for blue wheels and a minimum of -.5 degrees of camber, G-bodies tend to go positive under real compression. Hell, most cars I build start at -1.0 on camber.....
Keep up the good work! Not sure how you pull it off between the Grand Prix, Camaro, and Galaxie....
Thanks for chiming in on the wheels and for your interest. We may go to -1 degree on camber but we are satisfied with the front end being within spec for now. Sean is going to pay special attention to how the car turns in the near future and we may go back to that for an adjustment.
Yeah having three project cars is a real time commitment. Don't forget three pickup trucks (Sean's, Dad's, mine) and mom's car that I work on too!. Still, time spent with my Dad and my brother working on these cars is time well spent that I will never forget.
Looking good Jared! You guys do nice work...keep it up! Will be watching for further updates.
Thanks Kevin! Careful what you wish for. I have big update following this post. Thanks for always having something nice to say and for your interest, my friend.
I hope my son never sees pictures of this car, because He will bug me about trying to find one like it every day.
The Caster numbers should be good. The higher the better for tracking straight, but the wheels start flopping around when you turn if you go too high.
Thanks for the compliment and thanks for sharing the knowledge. Sean and I both appreciate it.
Well, the Monte is in the garage patiently waiting on me to get some money rounded up to start working on it. With Spring time just around the corner hopefully I'll be able to get out and make some money. Lately I've been working around the house trying to get a few things done and the wife bought an almost new Malibu. One of the reasons she bought a new car is so I wouldn't have to work on it all the time like her last car. The bad part is that the payments on the new car are taking up the money that could have partially went towards parts for the Monte Carlo. Hopefully in the next few months I can get started on the Monte again.
I've been meaning to catch up on your Grand Prix thread too. You're definitely motivated and active in this hobby. Keep up the good work.
Thanks Chris! I appreciate the compliment and the encouragement. Thanks for the update on the Monte. I can identify with needing money to move forward. At the beginning of this past fall when I got going on the GP again, I thought I had just about everything I needed to get it back together. WRONG! It's about to get hot here so the GP will be going into hibernation soon for the summer. My wallet needs the break.
I hope to see some updates on the Monte this summer.
How much compression travel do you have?....that will tell you how much negative chamber you want. The less travel the more static neg chamber you should have. The more compression travel you have the more negative chamber you'll get so with less travel you want more chamber so on a corner your tire contact pressure will be more evenly distributed and won't try to roll over.
the best way to check the chamber you have at full compression is to remove the spring and shock but since it's a street car you can set it up the way your think it'll work and then put some chalk on the side wall from about 2" and down to the edge of the tread on a front tire and take it for a test ride. That will tell you if the tire is rolling over in a corner. Another thing you can do is to use a laser thermometer and look at the inside, middle and outside thread temps to see if the tire is riding too hard on the inside with the negative chamber settings.
Steve, Thanks for following along and thanks for sharing your knowledge on setting up these front ends. It's obvious you know what you are talking about. We both appreciate you chiming in.
Isn`t that fun probably a number of us are multi .I have a 1981 El Camino SS as a daily driver,And I also have my "toy' a 1979 Z-28 RS Camaro Pro-touring car.
Cool Z28!

Alright guys! The Camaro Thrash is finished. We've worked on the car 11 days in a row and gotten everything we wanted to done. It's amazing what can be done when you have what you need and can devote the time. This was great time spent with Sean that I'll never forget and I'm so happy with how everything turned out. This is going to be a lengthy update so be prepared.
My last update was last Tuesday. We had adjusted the rear brakes, flushed the brake system, and Sean had glued the trunk mat down. Wednesday morning Sean got started with reloading the trunk with the spare tire, the jack, tire iron, and the small set of tools we keep in there. Here's a pic of the reloaded trunk....

We consider the trunk finished. Next we worked on pulling the driver's side door glass out of the door. If you remember, we've long planned to replace the door glass on both sides because we used the best used glass we had when we put the car back together but both pieces had some scratches that we felt let the car down. We've been holding off on putting the door panels on the doors all this time because we've been waiting to get the door glass replaced. We got the old glass pulled, got the hardware (lower track and front and rear rollers) transferred to the new piece of glass. Then we put it back together and started working on the adjustment. I have to say I'm better at this than I was four or more years ago when we put the glass back in the car the first time. I was pretty patient and methodical. I have a better understanding of what each adjustment does. Sean was very helpful as an extra set of hands and eyes. Often times I was in the car rolling the glass up and down (power windows) and he was on the outside looking at how it looked out there and what it was doing. It was very much a team effort. Late in the day we had the driver's glass adjusted completely to our satisfaction. It's fitting and working the best it ever has. The driver's side door is opening and shutting the best it ever has. The doors/side windows on this car are very similar to the Regal/Cutlass/Monte/GP. Long doors with unframed, unsupported glass. Fitment and adjustment are key to how the door and windows operate and hence the overall experience of driving the car. Here are some pics from Wednesday night...


We had some time left in our evening and were feeling enthused so we went ahead and pulled the window and tracks out of the passenger door to get ahead for Thursday. Thursday morning we transferred the hardware from the old passenger side window to the new one and moved forward with putting it in the door and getting it adjusted. Our painter had replaced the roof rail weatherstrips while he had the car and we also had to fine tune his installation of them on both sides before we finalized our adjustments. Here is a look at the passenger side glass in the door...

Once we had the passenger door glass adjusted, we started on installing the passenger door panel. Sean's wife and I bought Sean the door panels for his birthday, I think in 2016. Getting the door panels on the car has been a long time coming, obviously. They are reproduction. When you take them out of the box, nothing, save the door lock rod opening is cut out. You have to cut for the inside door handle, the arm rest, the door lock switch, the mirror adjustment cable, all the clips, etc. There are perforations on the back side for most everything but some perforations were better defined than others. Here is a look at some of that work...

Here's a look at the new vapor barrier on the passenger door...

We had some trouble with installing the passenger door panel. Our trouble started with where we located the power lock switch. The car was a manual lock car that we put power locks into. We didn't have 78 Camaro power lock switches and we didn't have old examples of power lock door panels. We based where to put the switches in the panel off of pictures in a book on second gen Camaro's we have that we call the 'Spotter's Guide". The inner structure of the doors have a 'cove' in the vicinity of where the spotter's guide indicated the switches were supposed to go so we thought we were on the right track. Sean went ahead and located the power lock switch in the passenger door panel by centering it between the bright trim and the inside door handle (vertically), and by lining its front edge up with the front edge of the door handle. Once we put the panel up and started trying to install it, the location we put our switch in the door panel didn't align with the 'cove' in the inner structure of the door shell. Uh oh. We pulled the door panel off and started trying to figure out how to salvage the situation. We were using typical 70's-80's GM style power lock switches. There just wasn't enough room between the door panel and the door shell for the connector pins and the connector. I decided I could modify the switch to make it shallower and we could salvage the door panel and still be able to match it on the driver's side. I cut the pins off of the switch and soldered leads to the remainder of each pin....

This is where we ended on Thursday. We were both a little frustrated but I felt we had a viable path forward and that we would be able to button the passenger door panel up on Friday. The driver's door panel was another story. We had an interior fastener kit that was supposed to include all the clips etc. we needed to put the door panels on. Unfortunately they only gave us enough of the metal style clips and the corresponding plastic "barrels" that press in the door shell for one side. We had plenty of good used clips on hand so we were good there. When we went in that night I started the search to get those barrels for the driver's side here ASAP. I had already gone to NAPA and struck out, and had done some searching on my phone to try and find them locally and struck out. I ended up buying them from Rick's Camaros (Eckler's). It was after hours Thursday evening when I placed the order. I paid next-day-air shipping (stupid cost) to get them here as soon as possible. More on that later.
Friday morning we got back on the passenger door panel and had a little more bad time with it. It turned out even my modified switch was too thick to fit in the real estate we had between the door panel and the door shell. We ended up pulling the door panel again, plastic-ing up both door openings and both new windows and we cut openings in the door shells (with a Dremel and hacksaw blade) on both sides to make room for the lock switches. The door panel wasn't that much fun to work on. I don't find interior work to be that easy but we stayed with it and the end result was quite rewarding...


That's a good place to go ahead and post this but I've got quite a bit more to share. To be Continued ==>
My last update was last Tuesday. We had adjusted the rear brakes, flushed the brake system, and Sean had glued the trunk mat down. Wednesday morning Sean got started with reloading the trunk with the spare tire, the jack, tire iron, and the small set of tools we keep in there. Here's a pic of the reloaded trunk....
We consider the trunk finished. Next we worked on pulling the driver's side door glass out of the door. If you remember, we've long planned to replace the door glass on both sides because we used the best used glass we had when we put the car back together but both pieces had some scratches that we felt let the car down. We've been holding off on putting the door panels on the doors all this time because we've been waiting to get the door glass replaced. We got the old glass pulled, got the hardware (lower track and front and rear rollers) transferred to the new piece of glass. Then we put it back together and started working on the adjustment. I have to say I'm better at this than I was four or more years ago when we put the glass back in the car the first time. I was pretty patient and methodical. I have a better understanding of what each adjustment does. Sean was very helpful as an extra set of hands and eyes. Often times I was in the car rolling the glass up and down (power windows) and he was on the outside looking at how it looked out there and what it was doing. It was very much a team effort. Late in the day we had the driver's glass adjusted completely to our satisfaction. It's fitting and working the best it ever has. The driver's side door is opening and shutting the best it ever has. The doors/side windows on this car are very similar to the Regal/Cutlass/Monte/GP. Long doors with unframed, unsupported glass. Fitment and adjustment are key to how the door and windows operate and hence the overall experience of driving the car. Here are some pics from Wednesday night...
We had some time left in our evening and were feeling enthused so we went ahead and pulled the window and tracks out of the passenger door to get ahead for Thursday. Thursday morning we transferred the hardware from the old passenger side window to the new one and moved forward with putting it in the door and getting it adjusted. Our painter had replaced the roof rail weatherstrips while he had the car and we also had to fine tune his installation of them on both sides before we finalized our adjustments. Here is a look at the passenger side glass in the door...
Once we had the passenger door glass adjusted, we started on installing the passenger door panel. Sean's wife and I bought Sean the door panels for his birthday, I think in 2016. Getting the door panels on the car has been a long time coming, obviously. They are reproduction. When you take them out of the box, nothing, save the door lock rod opening is cut out. You have to cut for the inside door handle, the arm rest, the door lock switch, the mirror adjustment cable, all the clips, etc. There are perforations on the back side for most everything but some perforations were better defined than others. Here is a look at some of that work...
Here's a look at the new vapor barrier on the passenger door...
We had some trouble with installing the passenger door panel. Our trouble started with where we located the power lock switch. The car was a manual lock car that we put power locks into. We didn't have 78 Camaro power lock switches and we didn't have old examples of power lock door panels. We based where to put the switches in the panel off of pictures in a book on second gen Camaro's we have that we call the 'Spotter's Guide". The inner structure of the doors have a 'cove' in the vicinity of where the spotter's guide indicated the switches were supposed to go so we thought we were on the right track. Sean went ahead and located the power lock switch in the passenger door panel by centering it between the bright trim and the inside door handle (vertically), and by lining its front edge up with the front edge of the door handle. Once we put the panel up and started trying to install it, the location we put our switch in the door panel didn't align with the 'cove' in the inner structure of the door shell. Uh oh. We pulled the door panel off and started trying to figure out how to salvage the situation. We were using typical 70's-80's GM style power lock switches. There just wasn't enough room between the door panel and the door shell for the connector pins and the connector. I decided I could modify the switch to make it shallower and we could salvage the door panel and still be able to match it on the driver's side. I cut the pins off of the switch and soldered leads to the remainder of each pin....
This is where we ended on Thursday. We were both a little frustrated but I felt we had a viable path forward and that we would be able to button the passenger door panel up on Friday. The driver's door panel was another story. We had an interior fastener kit that was supposed to include all the clips etc. we needed to put the door panels on. Unfortunately they only gave us enough of the metal style clips and the corresponding plastic "barrels" that press in the door shell for one side. We had plenty of good used clips on hand so we were good there. When we went in that night I started the search to get those barrels for the driver's side here ASAP. I had already gone to NAPA and struck out, and had done some searching on my phone to try and find them locally and struck out. I ended up buying them from Rick's Camaros (Eckler's). It was after hours Thursday evening when I placed the order. I paid next-day-air shipping (stupid cost) to get them here as soon as possible. More on that later.
Friday morning we got back on the passenger door panel and had a little more bad time with it. It turned out even my modified switch was too thick to fit in the real estate we had between the door panel and the door shell. We ended up pulling the door panel again, plastic-ing up both door openings and both new windows and we cut openings in the door shells (with a Dremel and hacksaw blade) on both sides to make room for the lock switches. The door panel wasn't that much fun to work on. I don't find interior work to be that easy but we stayed with it and the end result was quite rewarding...
That's a good place to go ahead and post this but I've got quite a bit more to share. To be Continued ==>
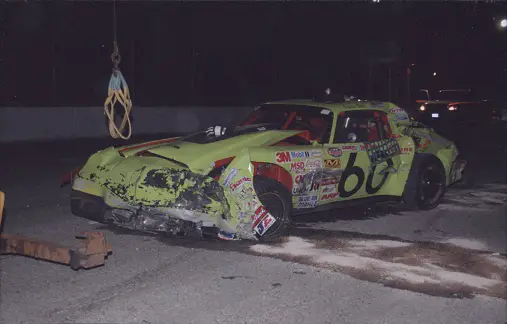
Jared, if you remember we ran a 2nd gen Camaro in a superstock division for a few years so I have a bit of experience on these Camaros , this Camaro was a top runner with a few wins and the weekend after this minor bump we were back up front...
Our replacement radiator showed up Friday afternoon...

It looks to be well built and we really like the lifetime warranty. We wish it had been made in the USA and wish that the USA made radiator that we had, had held up better but oh well.
Towards the end of the day I called Eckler's to check on the status of my door panel barrel nut order. It didn't get picked up until 3:30 Friday and we wouldn't have it until Monday. I was not happy. I paid next day air shipping and paid extra for them to expedite processing the order. I decided I could live (would have to live) with getting them around 10 AM on Monday (when the FedEx truck normally comes by). More on that later.
Saturday morning we started with installing the radiator. It was pretty straight forward but the new radiator wasn't as tall as the old one so we had to cut down our lower fan mounting brackets and drill new holes in them where they mount to the lower portion of the core support. I elected to repaint those brackets rather than put them back on the car with the ends of them bare so we had to wait for the paint to dry.
While we did, we worked on the air intake. One of the places where we were pretty sure we were getting some unmetered air was where the crankcase breather hose tied into the air intake elbow. We had initially tried to use a rubber grommet and a vacuum fitting to make the connection but weren't able to make the grommet and fitting fit in the hole in the elbow tight enough. We ended up resolving this by using a pipe thread hose barb fitting and a few washers for spacers. The barb fitting threads right into the elbow. The spacers are only needed since there is an unthreaded shoulder on our fitting below its hex. We used a little clear silicone between each washer, between the intake elbow and the lower washer and between the fitting and the upper washer. It turned out well...

I also worked on the lock switch for the driver's side door to get ready to put it in the panel. Our aftermarket switches were not of the utmost quality. The pins wanted to push out when you put the wiring connector on the switch. Also, the switch had the tendency to just come apart when you pressed lock or unlock. I removed the two pressed in pins and glued them in with super glue. I also glued the back of the switch to the bezel. It sounds easier than it was. We also worked on improving how the passenger roof rail weatherstrip was glued down at its front end where it meets the front of the door shell.
We also did quite a bit of running around on Saturday, both running for parts and for stuff for my nephew's 22nd birthday. We had family over that evening to BBQ and celebrate.
Sunday we went back to installing the radiator and fans. We got the fans back in the car with our modified lower mounting brackets and discovered the radiator was fitting loosely in the rubber saddles (would wiggle fore and aft). It turns out the tanks for the old radiator were wider than the new one and we had modified our saddles (urethane) to accommodate it. Fortunately I had a set of new urethane saddles for the GP over at the storage. I went and grabbed them and we were able wrap up the installation of the radiator.
We got the air intake reinstalled and cranked the car up. It didn't race on cold start up which was a good sign we had been successful with our quest to remedy the un-metered air. We took the car for a test drive. It was still morning. It was a fun drive. We had a lot of wins. The un-metered air issue was solved. The rear brake adjustment was a stunning success. The car's brakes were dramatically improved and the emergency brake was completely effective. The steering wheel was straight. The windows were going up and down smoothly. I enjoyed having a door panel, and arm rest on my side. It was awesome. We got the car back home and did a little more work to make the car better. Sean got under the car and touched up the paint on the tie rod end adjusters. I worked on oiling the hood hinges and hood latch. I know this sounds like a small thing but it was transformative. The hood had gotten pretty stiff. I used an oil can with 30 weight non-detergent motor oil to lube the hood hinges. I held a paper towel under each pivot point and flooded each with oil. It took some time but worked way better than using aerosol white lithium grease. At this point our list of things we wanted to do to the car was getting short. The biggest thing left was to install the driver's side door panel. We were just waiting for the panel clip barrels to show up.
Monday was a short day. We had plans to go to the Astros home opener that afternoon. We waited all day for those barrels to show up. They never did. In the meantime we programmed a new, smaller remote for the garage door to the Camaro bay. We did some clean up in the Camaro bay. Sean put Rain-X on all of the exterior glass. We worked on coming up with some speaker grills for the front speakers. If you remember, Sean and I managed to shoehorn 6"x9" speakers in the stock kick panels. They are so tight to the toeboards, HVAC case and the E-brake mechanism that the grills that came with them would not fit (way too big). We ended up cutting the mesh out of the grills that came with the speakers and then painting them with low gloss black. We also diagnosed why the cruise control wasn't working. It turned out that we weren't getting +12V to the cruise module that runs through the brake light switch and the clutch pedal momentary switch. My back has been tender all week so I didn't want to get under the dash ahead of the ballgame. That was our Monday. We left for the ballgame at 3:00. The barrel nuts were delivered at 3:40. I was pissed about that.
Sean and I had a goooood time at the ballgame last night. We got a little slower start this morning. Sean beat me out there and got the painted speaker grills installed. It's hard to get a picture on these but here you go....

We just fastened them with 3M two-sided tape. You really can't see them. We just want to protect the speakers from feet, mainly those of the passengers.
Next we worked on the driver's side door panel. It was a bit of a fight. We ended up having to plastic the car up again and trim our opening for the door lock switch on the upper end. The OE connector was hitting the door shell. The armrest fought. I even poked an un-needed hole in the door panel at the front end of the armrest/door pull but thankfully it is covered by the armrest. With some perseverance we got the driver's side door panel buttoned up....

We took a short break from the car and swapped out the blower motor in my brother's 02 GMC Sierra. I had been wanting to get to that all week. Then we got back on the car. Now that we had door panels on both sides, we optimized the tune on the stereo. We were able to do all of it with the head unit (fader, bass, treble, mid, subwoofer level, etc.). We've got it sounding really good. Then we both got under the dash and together (not at the same time, obviously) we got the brake light and clutch pedal switches adjusted and got the cruise working again. This was everything on our list. It was getting close to the rush hour so we only took the car for a short victory lap but it was fun.
The car is as complete as it has ever been, going all the way back to 1985. It is running very well and everything works. It's painted and the interior is complete. As I said previously, Sean and I believe these cars are never 100% finished but this car is extremely close. It was a hell of a week. We're both thrilled. Sean is going to drive the car to work tomorrow. I know he is going to enjoy it.
That's it for now gents. Thanks for following along. I don't know when the next update will be, but there will be one. Until then.....
Best,
Jared
It looks to be well built and we really like the lifetime warranty. We wish it had been made in the USA and wish that the USA made radiator that we had, had held up better but oh well.
Towards the end of the day I called Eckler's to check on the status of my door panel barrel nut order. It didn't get picked up until 3:30 Friday and we wouldn't have it until Monday. I was not happy. I paid next day air shipping and paid extra for them to expedite processing the order. I decided I could live (would have to live) with getting them around 10 AM on Monday (when the FedEx truck normally comes by). More on that later.
Saturday morning we started with installing the radiator. It was pretty straight forward but the new radiator wasn't as tall as the old one so we had to cut down our lower fan mounting brackets and drill new holes in them where they mount to the lower portion of the core support. I elected to repaint those brackets rather than put them back on the car with the ends of them bare so we had to wait for the paint to dry.
While we did, we worked on the air intake. One of the places where we were pretty sure we were getting some unmetered air was where the crankcase breather hose tied into the air intake elbow. We had initially tried to use a rubber grommet and a vacuum fitting to make the connection but weren't able to make the grommet and fitting fit in the hole in the elbow tight enough. We ended up resolving this by using a pipe thread hose barb fitting and a few washers for spacers. The barb fitting threads right into the elbow. The spacers are only needed since there is an unthreaded shoulder on our fitting below its hex. We used a little clear silicone between each washer, between the intake elbow and the lower washer and between the fitting and the upper washer. It turned out well...
I also worked on the lock switch for the driver's side door to get ready to put it in the panel. Our aftermarket switches were not of the utmost quality. The pins wanted to push out when you put the wiring connector on the switch. Also, the switch had the tendency to just come apart when you pressed lock or unlock. I removed the two pressed in pins and glued them in with super glue. I also glued the back of the switch to the bezel. It sounds easier than it was. We also worked on improving how the passenger roof rail weatherstrip was glued down at its front end where it meets the front of the door shell.
We also did quite a bit of running around on Saturday, both running for parts and for stuff for my nephew's 22nd birthday. We had family over that evening to BBQ and celebrate.
Sunday we went back to installing the radiator and fans. We got the fans back in the car with our modified lower mounting brackets and discovered the radiator was fitting loosely in the rubber saddles (would wiggle fore and aft). It turns out the tanks for the old radiator were wider than the new one and we had modified our saddles (urethane) to accommodate it. Fortunately I had a set of new urethane saddles for the GP over at the storage. I went and grabbed them and we were able wrap up the installation of the radiator.
We got the air intake reinstalled and cranked the car up. It didn't race on cold start up which was a good sign we had been successful with our quest to remedy the un-metered air. We took the car for a test drive. It was still morning. It was a fun drive. We had a lot of wins. The un-metered air issue was solved. The rear brake adjustment was a stunning success. The car's brakes were dramatically improved and the emergency brake was completely effective. The steering wheel was straight. The windows were going up and down smoothly. I enjoyed having a door panel, and arm rest on my side. It was awesome. We got the car back home and did a little more work to make the car better. Sean got under the car and touched up the paint on the tie rod end adjusters. I worked on oiling the hood hinges and hood latch. I know this sounds like a small thing but it was transformative. The hood had gotten pretty stiff. I used an oil can with 30 weight non-detergent motor oil to lube the hood hinges. I held a paper towel under each pivot point and flooded each with oil. It took some time but worked way better than using aerosol white lithium grease. At this point our list of things we wanted to do to the car was getting short. The biggest thing left was to install the driver's side door panel. We were just waiting for the panel clip barrels to show up.
Monday was a short day. We had plans to go to the Astros home opener that afternoon. We waited all day for those barrels to show up. They never did. In the meantime we programmed a new, smaller remote for the garage door to the Camaro bay. We did some clean up in the Camaro bay. Sean put Rain-X on all of the exterior glass. We worked on coming up with some speaker grills for the front speakers. If you remember, Sean and I managed to shoehorn 6"x9" speakers in the stock kick panels. They are so tight to the toeboards, HVAC case and the E-brake mechanism that the grills that came with them would not fit (way too big). We ended up cutting the mesh out of the grills that came with the speakers and then painting them with low gloss black. We also diagnosed why the cruise control wasn't working. It turned out that we weren't getting +12V to the cruise module that runs through the brake light switch and the clutch pedal momentary switch. My back has been tender all week so I didn't want to get under the dash ahead of the ballgame. That was our Monday. We left for the ballgame at 3:00. The barrel nuts were delivered at 3:40. I was pissed about that.
Sean and I had a goooood time at the ballgame last night. We got a little slower start this morning. Sean beat me out there and got the painted speaker grills installed. It's hard to get a picture on these but here you go....
We just fastened them with 3M two-sided tape. You really can't see them. We just want to protect the speakers from feet, mainly those of the passengers.
Next we worked on the driver's side door panel. It was a bit of a fight. We ended up having to plastic the car up again and trim our opening for the door lock switch on the upper end. The OE connector was hitting the door shell. The armrest fought. I even poked an un-needed hole in the door panel at the front end of the armrest/door pull but thankfully it is covered by the armrest. With some perseverance we got the driver's side door panel buttoned up....
We took a short break from the car and swapped out the blower motor in my brother's 02 GMC Sierra. I had been wanting to get to that all week. Then we got back on the car. Now that we had door panels on both sides, we optimized the tune on the stereo. We were able to do all of it with the head unit (fader, bass, treble, mid, subwoofer level, etc.). We've got it sounding really good. Then we both got under the dash and together (not at the same time, obviously) we got the brake light and clutch pedal switches adjusted and got the cruise working again. This was everything on our list. It was getting close to the rush hour so we only took the car for a short victory lap but it was fun.
The car is as complete as it has ever been, going all the way back to 1985. It is running very well and everything works. It's painted and the interior is complete. As I said previously, Sean and I believe these cars are never 100% finished but this car is extremely close. It was a hell of a week. We're both thrilled. Sean is going to drive the car to work tomorrow. I know he is going to enjoy it.
That's it for now gents. Thanks for following along. I don't know when the next update will be, but there will be one. Until then.....
Best,
Jared
Last edited:
Looks great! Congrats on the hard work. Now I would like to see that thing put some rubber to the road ( and pics to prove it ) LOL
Jared, congrats to you and Sean on hammering down and checking off the punch list! The Camaro looks great with the interior all buttoned up, new glass, etc. I bet Sean is stoked to drive it more now than ever.
Enjoy that beautiful car, you guys have earned it!
Enjoy that beautiful car, you guys have earned it!
Similar threads
- Replies
- 1
- Views
- 113
- Replies
- 10
- Views
- 562
- Replies
- 35
- Views
- 1K
GBodyForum is a participant in the Amazon Services LLC Associates Program, an affiliate advertising program designed to provide a means for sites to earn advertising fees by advertising and linking to amazon.com. Amazon, the Amazon logo, AmazonSupply, and the AmazonSupply logo are trademarks of Amazon.com, Inc. or its affiliates.